Residential Solar — Zero to Hero
Guide Info
Read time: ~60 min
Hands-on: Varies by scope
Difficulty: Beginner
A complete guide to going solar in the Philippines — from zero knowledge to a fully monitored, Home Assistant-integrated solar system. Covers system types, budget tiers with real pricing, component selection, HA automations, EV charging, net metering, and real Filipino homeowner experiences.
Regional Focus
This guide is written for the Philippines (Meralco/ERC territory). The solar fundamentals, Home Assistant integration, and EV charging sections apply globally.
AI-Assisted Setup — Copy this prompt to your AI
Want an AI (ChatGPT, Claude, Gemini, etc.) to help size your system? Copy-paste the prompt below and replace the placeholders with your values.
I want you to help me design a residential solar system for my home in the Philippines.

My environment:
- Location: <YOUR_CITY/PROVINCE>
- Monthly electricity bill: ₱<YOUR_BILL>
- Utility: <MERALCO/VECO/OTHER>
- Home type: <SINGLE-STORY/TWO-STORY/TOWNHOUSE>
- Roof type: <METAL/CONCRETE/TILE>
- Appliances to power: <LIST YOUR MAJOR APPLIANCES>
- Budget range: <YOUR_BUDGET>
- Want battery backup: <YES/NO>
- Plan to get EV: <YES/NO>
- Have Home Assistant: <YES/NO>

Follow this guide exactly:
https://docs.example.homelab/guides/solar-home-guide/

Help me:
1. Pick the right system type (grid-tied vs hybrid vs off-grid)
2. Size my system based on my bill and appliances
3. Choose components (panels, inverter, battery) with PH availability
4. Estimate costs and ROI payback period
5. Plan my Home Assistant integration
Reading Order
- 01-why-solar
- 02-solar-101
- 03-decision-matrix
- 04-budget-tiers
- 05-components
- 06-home-assistant
- 07-ev-charging
- 08-installation
- 09-net-metering
- 10-real-world
- 11-maintenance
- 12-resources
Why Go Solar in the Philippines?
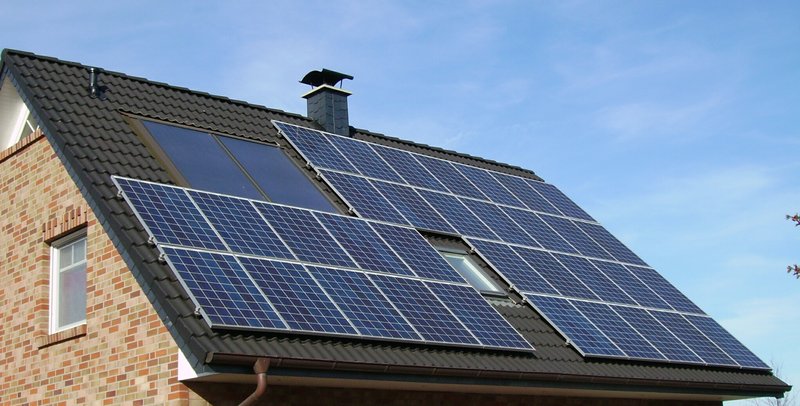 Solar panels on a Philippine rooftop — this is what a typical residential installation looks like. Image: Public Domain
Ask any Filipino solar owner why they went solar, and the answer comes back almost instantly: guilt-free aircon. On Reddit, that single phrase pulled 384 upvotes — and for good reason. When temperatures push past 35°C for months at a time, choosing between comfort and a manageable electricity bill is a miserable trade-off. Solar removes that trade-off entirely.
The Financial Case
Meralco rates hit ₱13.17/kWh in February 2026 and have been climbing 3–5% annually for years. At that rate, the math works strongly in favor of solar:
- A 5 kWp system costs roughly ₱230,000–₱375,000 installed
- Monthly savings land between ₱3,000 and ₱8,000 depending on usage
- Payback period is typically 3–5 years — roughly a 14% annual ROI
That ROI beats most savings accounts, time deposits, and even many stock portfolios — with zero volatility and a 25-year panel lifespan.
Beyond the Bill
The financial case is compelling, but Filipino solar owners cite several practical benefits that matter just as much:
- Brownout independence — Hybrid systems with battery storage let you ride out outages. One Reddit user ran their home through a 2-week typhoon outage without touching their Meralco connection.
- EV-ready home — The Philippine EV market is growing fast. Solar-generated electricity at roughly ₱0/kWh is the cleanest and cheapest way to charge at home.
- Smart energy management — Home Assistant integration lets you automate load shifting, monitor generation vs. consumption in real time, and optimize battery usage automatically.
The Environmental Bonus
Reducing your carbon footprint is real, but community sentiment is honest: most people go solar for the savings and the comfort first. The environmental benefit is a welcome bonus, not the primary driver.
Real-World Problems This Solves
- "My Meralco bill is ₱10,000/month and it goes up every summer"
- "We can't run the aircon during the day — it costs too much"
- "Every brownout kills my homelab server mid-task"
- "I want to charge my EV at home without doubling my electricity bill"
TL;DR
Meralco rates at ₱13.17/kWh and rising make the financial case for solar undeniable — a 5 kWp system pays itself back in 3–5 years at ~14% annual ROI. Beyond the savings, hybrid solar gives you brownout independence, EV-ready charging, and the ability to run the aircon guilt-free all summer.
Solar 101 — The Basics
Before sizing a system or comparing quotes, you need a working model of how solar actually functions. This section covers the essentials — no physics degree required.
How Solar Panels Generate Electricity
Solar panels are made up of photovoltaic (PV) cells — materials (usually silicon) that release electrons when struck by photons of light. Those moving electrons create direct current (DC) electricity (a steady one-way flow of power, like water through a pipe).
Your home runs on alternating current (AC) (power that rapidly switches direction — this is what comes out of your wall outlets), so the DC output from the panels flows into an inverter (a wall-mounted box that converts the panel's DC power into the AC power your appliances need), which converts it to usable AC power. That's the entire chain at its simplest:
Sunlight → Panels (DC) → Inverter (AC) → Your loads
Everything else in a solar system — batteries, meters, monitoring — builds on top of this core flow.
Key Terms You Need to Know
| Term | What It Means |
|---|---|
| kW (kilowatt) | Power — how much your system can produce at peak. A 5 kW system outputs 5,000 watts under ideal conditions. |
| kWh (kilowatt-hour) | Energy — what you actually consume and what Meralco bills you for. Running a 1 kW load for 1 hour = 1 kWh. |
| kWp (kilowatt-peak) | The rated maximum output of your solar panels under Standard Test Conditions (STC — a lab setting with ideal sunlight and temperature). This is the number used in system sizing. |
| Peak Sun Hours (PSH) | Hours of equivalent full sunlight per day. The Philippines averages 4.5–5.5 PSH depending on location and season. |
PSH vs. hours of daylight
The sun shines for 10–12 hours a day in the Philippines, but not all of that is full intensity. PSH is a normalized figure — a 4.5 PSH day means the total solar energy received equals 4.5 hours at peak (1,000 W/m²). This is what you use when calculating expected daily output.
The 4 Core Components
 Complete hybrid solar system layout — from rooftop panels down to your home loads, battery, grid connection, EV charger, and Home Assistant monitoring. Color-coded wires show the flow of power through the system.
-
Solar Panels — Convert sunlight to DC electricity. Rated in watts (W) or kilowatts-peak (kWp). Most residential panels today are monocrystalline, ranging 400–600 W each.
-
Inverter — Converts DC to AC and is effectively the brain of the system. It handles MPPT (Maximum Power Point Tracking — the inverter's built-in optimizer that squeezes maximum power from your panels), grid sync, safety shutdowns, and monitoring. The inverter type largely determines your system's capabilities.
-
Battery (optional) — Stores excess solar energy for use at night or during brownouts. Lithium iron phosphate (LiFePO4) is the standard chemistry for residential use today.
-
Meter / Grid Connection — How your system interfaces with the utility. Either a net metering setup (energy flows both ways — you sell excess power back to Meralco) or a zero-export limiter (a device that automatically throttles your system so no power goes back to the grid).
Most PH residential is single-phase 230V
Philippine homes are almost universally on single-phase 230V. This matters when selecting inverters — most residential inverters are single-phase. Three-phase setups are typically for commercial/industrial installations.
Energy Flow Diagram
 How energy flows through your solar system — from sunlight to panels to inverter, then split between your home loads, battery storage, and the grid.
During the day, solar covers your loads first. Excess charges the battery (if present) or exports to the grid. At night, the home draws from battery or imports from the grid.
System Types Overview
Three main configurations exist for residential solar. The right one depends on your goals and budget — see the Decision Matrix for a structured comparison.
| Type | Battery | Grid Connection | Brownout Backup | Typical Use Case |
|---|---|---|---|---|
| Grid-Tied | No | Yes | No | Lowest cost, bill reduction only |
| Hybrid | Yes | Yes | Yes | Most popular PH residential choice |
| Off-Grid | Yes | No | Yes (fully independent) | Remote areas, no grid access |
Grid-Tied is the cheapest entry point but leaves you without power during brownouts (the inverter shuts down automatically — this is a safety feature called anti-islanding that protects utility workers repairing lines nearby). Hybrid adds a battery for backup and energy independence. Off-Grid is sized to cover 100% of your needs — battery banks are large and costs are highest.
Start here if you're overwhelmed
Most homeowners in Metro Manila and urban areas choose hybrid — it covers brownouts, reduces the bill, and the battery pays for itself over time. Off-grid is rarely needed unless you're in a barangay with unreliable grid access.
Decision Matrix — Which System Type?
Before sizing panels and picking inverters, you need to answer one foundational question: which system architecture fits your situation? The three options — grid-tied, hybrid, and off-grid — have very different cost profiles, capabilities, and trade-offs. This section walks you through a structured decision process so you land on the right answer before spending a peso.
Find Your System Type
Work through this flowchart top to bottom. The first "exit" condition that applies to you is your answer.
 Answer five questions to find your ideal system type. Follow the arrows from top to bottom.
The flowchart covers the five decisions that matter most for Philippine households: brownout frequency, outage tolerance, EV charging needs, budget band, and Home Assistant integration. Most households in Metro Manila and brownout-prone provinces land on Hybrid — it is the sweet spot between cost and resilience.
System Type Comparison
Once you know your direction, use this table to pressure-test your choice.
| Factor | Grid-Tied | Hybrid | Off-Grid |
|---|---|---|---|
| Cost (5 kW system) | ₱230,000–₱375,000 | ₱375,000–₱475,000 | ₱500,000–₱625,000 |
| Brownout backup | No | Yes | Yes (full) |
| Net metering eligible | Yes | Yes | N/A |
| Battery required | No | Yes | Yes (large) |
| EV-ready | Add-on | Built-in capable | Built-in capable |
| ROI payback | 3–5 years | 4–7 years | 8–12 years |
| Best for | Max savings, stable grid | Brownout-prone areas, future-proof | Remote or no grid access |
| Complexity | Simplest | Moderate | Most complex |
| HA integration | Supported | Supported | Supported |
A few clarifications on the table:
- Net metering for hybrid: the system exports excess solar to the grid when the battery is full, so it qualifies — but Meralco's approval process still applies.
- EV add-on for grid-tied: you can add a separate EV charger, but without a battery you lose the ability to charge the EV from stored solar overnight.
- HA integration is effectively equal across all three because it depends on the inverter brand, not the system topology. Solis, Goodwe, SMA, and Growatt all expose Modbus/RS485 data that Home Assistant can read via ESPhome or dedicated integrations.
Key Warnings
Grid-Tied = Zero Power During Brownouts
Grid-tied systems shut down completely during a power outage — even if the sun is shining. This is a safety requirement called anti-islanding protection (a safety feature that automatically shuts off your solar during brownouts to protect utility workers who may be repairing power lines nearby): the inverter must cut off when the grid goes down to prevent backfeeding live power onto lines where workers may be operating. If brownouts are common in your area, hybrid is worth the premium. A ₱100,000–₱150,000 premium for battery storage is cheap insurance against months of outages per year.
Standard Meter Warning
Without net metering approval or a zero-export limiter, a standard Meralco meter counts exported solar power as consumption — your bill goes UP instead of down. This is not a bug; the old-style bi-directional mechanical meter simply spins in both directions. You MUST do one of three things before energising a grid-tied or hybrid system:
- Get net metering approved by Meralco (the formal application process — allow 3–6 months)
- Install a zero-export limiter (a small sensor clamp on your main breaker that automatically throttles inverter output to match your current household load — prevents any power from flowing back to the grid)
- Go hybrid with sufficient battery capacity to absorb all excess solar before it reaches the grid
Option 2 is the fastest interim solution. Option 1 is the long-term goal for maximum ROI.
Quick Decision Summary
| Your Situation | Recommended System |
|---|---|
| Stable grid, budget-first, no EV plans | Grid-Tied |
| Brownouts 5+ hours/month OR EV within 3 years | Hybrid |
| Rural, unreliable grid, or complete independence goal | Off-Grid |
| Urban, stable grid, future EV, Home Assistant integration | Hybrid (best all-rounder) |
Most readers of this guide will land on Hybrid. The next sections cover how to size that system correctly for your household load.
Budget Tiers — What You Get at Each Level
Not all solar installs are the same. A ₱150K system and a ₱1M system are solving different problems. This section breaks down four realistic budget tiers — what you get, what you can power, and whether the extra spend is worth it for your situation.
Tier 1: ₱150-300K — The Smart Start
System: 3–5 kWp grid-tied
The entry point for most Philippine homeowners. No batteries, no brownout backup — but it slashes your daytime consumption bill significantly. Grid-tied means excess power goes back to the grid (or is wasted if your utility doesn't support net metering).
Components:
| Item | Spec | Est. Cost |
|---|---|---|
| Solar panels | 6–9x 550W (Trina Solar / JA Solar) | ₱4,500–5,000 each |
| Inverter | Deye 5kW grid-tied | ₱30–35K |
| Mounting + MC4 + wiring | Rails, MC4 connectors (waterproof snap-together plugs — like USB but for solar panels, they click together and lock), DC cables (thick red and black wires that carry power from panels to inverter) | ₱15–25K |
| Installation labor | Certified installer | ₱30–50K |
Monthly savings: ₱3,000–5,000
ROI payback: 3–4 years
What you can power:
- ✅ Daytime aircon (1–2 units)
- ✅ Refrigerator
- ✅ Homelab / server rack
- ✅ Lights and fans
- ✅ Washing machine
- ❌ Night loads (no battery)
- ❌ Brownout backup
Bang for buck: ⭐⭐⭐⭐⭐ (5/5) — Highest ROI of any tier. Fastest payback. Best starting point if budget is limited.
Upgrade path: Add a hybrid inverter and batteries later for brownout backup. Most panels and wiring carry over.
Tier 2: ₱300-600K — The Independence Builder
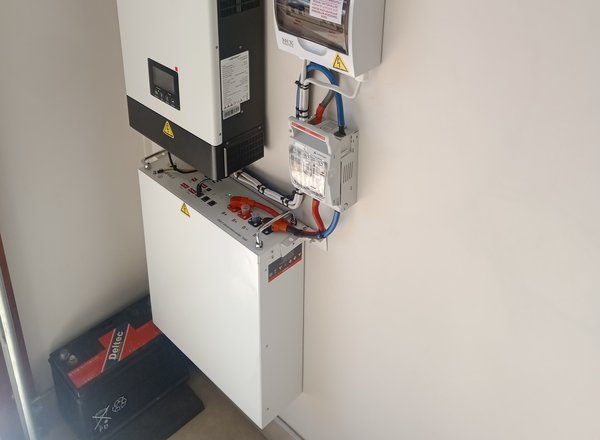
 A hybrid inverter (top) paired with a wall-mounted LiFePO4 battery (bottom) — this is the core of a Tier 2 system. Image: Wikimedia Commons, CC BY-SA 4.0
System: 5–8 kWp hybrid + 5–10 kWh battery
This is the sweet spot for most Filipino households. You get the daytime savings of Tier 1, plus brownout backup for essentials. A hybrid inverter manages both solar and battery, so you're covered during outages without needing a separate UPS.
Components:
| Item | Spec | Est. Cost |
|---|---|---|
| Solar panels | 9–15x 550W | ₱4,500–5,000 each |
| Inverter | Deye 5–8kW hybrid | ₱51–85K |
| LFP battery | 1–2x 48V 100Ah (Lazada brands) | ₱35–55K each |
| Grid monitoring | Shelly EM | ~₱2K |
| Mounting + wiring + labor | Full install | ₱60–90K |
Monthly savings: ₱5,000–8,000
ROI payback: 4–6 years
What you can power:
- ✅ Everything in Tier 1
- ✅ 4–8 hour brownout backup
- ✅ Night essentials (fridge, lights, router)
- ✅ Home automation and NAS overnight
- ❌ Full home overnight on battery alone
- ❌ EV charging
Bang for buck: ⭐⭐⭐⭐ (4/5) — Excellent balance of coverage and cost. The hybrid inverter opens the door to future battery expansion without replacing the whole system.
Upgrade path: Add more LFP batteries over time. Add an EV charger when ready. The inverter handles both without replacement.
Tier 3: ₱600K–1M — Near Zero Bill
System: 8–12 kWp hybrid + 10–20 kWh battery + EV-ready
For households with high consumption (multiple aircons, EV, home office), this tier brings your Meralco bill close to zero. The larger battery bank means multi-day brownout survival, and the system can charge an EV on excess solar during the day.
Components:
| Item | Spec | Est. Cost |
|---|---|---|
| Solar panels | 15–22x 550W | ₱4,500–5,000 each |
| Inverter | Huawei SUN2000 8–10kW hybrid or Deye 12kW | ₱65–150K |
| LFP batteries | 2–4x 48V 100Ah | ₱70–140K total |
| EV charger | go-e Charger or OpenEVSE | ₱30–50K |
| Grid monitoring | Shelly Pro 3EM | ~₱4.5K |
| Mounting + wiring + labor | Full install | ₱80–150K |
Monthly savings: ₱8,000–15,000 (near-zero bill achievable for many households)
ROI payback: 5–7 years
What you can power:
- ✅ Full home load (3–5 aircon units)
- ✅ EV charging during daylight
- ✅ Multi-day brownout survival on battery
- ✅ Home automation, NAS, server rack 24/7
- ✅ Near-zero Meralco bill achievable
Bang for buck: ⭐⭐⭐ (3/5) — Excellent coverage, but costs scale faster than savings at this range. Best suited for homes with EVs or very high bills (₱15K+/month).
Upgrade path: Add more batteries to reach full off-grid capability. Integrate with Home Assistant for automated load shifting and grid arbitrage.
Tier 4: ₱1M+ — Full Energy Independence
System: 12+ kWp, 20+ kWh battery, off-grid capable
The premium tier. You're not just reducing your bill — you're building resilience against grid failure, rate hikes, and brownout season. Premium panel brands (Jinko/LONGi N-type), premium inverters (Fronius or Huawei SUN2000), and a large battery bank that can run your home for multiple days without sun.
Components:
| Item | Spec | Est. Cost |
|---|---|---|
| Solar panels | 22+ x 550W+ N-type (Jinko / LONGi) | ₱6,000–8,000 each |
| Inverter | Fronius Symo GEN24 or Huawei SUN2000 | ₱150K+ |
| Battery bank | 20+ kWh LFP (branded: CATL / BYD) | ₱200K+ |
| EV charger | Integrated smart charger | ₱50–80K |
| Monitoring | Shelly Pro 3EM + Emporia Vue | ₱10–15K |
| Mounting + wiring + labor | Premium install | ₱100–200K |
Monthly savings: ₱10,000+ (potentially zero bill)
ROI payback: 7–10 years
What you can power:
- ✅ Complete energy independence
- ✅ Extended off-grid operation (3–5+ days)
- ✅ Full EV fleet charging
- ✅ High-consumption commercial-grade loads
- ✅ Premium reliability with tier-1 components
Bang for buck: ⭐⭐ (2/5) — Diminishing returns compared to Tier 2/3. The premium is mostly for resilience, longevity, and peace of mind — not faster ROI. Worth it if you're in a blackout-prone area or have very high consumption.
Tier Comparison at a Glance
| Tier 1 | Tier 2 | Tier 3 | Tier 4 | |
|---|---|---|---|---|
| Budget | ₱150–300K | ₱300–600K | ₱600K–1M | ₱1M+ |
| System type | Grid-tied | Hybrid | Hybrid + EV | Full independence |
| Savings/month | ₱3–5K | ₱5–8K | ₱8–15K | ₱10K+ |
| ROI payback | 3–4 yrs | 4–6 yrs | 5–7 yrs | 7–10 yrs |
| Brownout backup | ❌ | ✅ 4–8 hr | ✅ Multi-day | ✅ Indefinite |
| Night coverage | ❌ | ✅ Essentials | ✅ Full home | ✅ Full home |
| EV charging | ❌ | ❌ (prep only) | ✅ | ✅ |
| Bang for buck | ⭐⭐⭐⭐⭐ | ⭐⭐⭐⭐ | ⭐⭐⭐ | ⭐⭐ |
You don't have to buy the full system upfront
Start with Tier 1 or 2 and upgrade later. Most components carry over — panels, mounting rails, wiring, and MC4 connectors (waterproof snap-together plugs — like USB but for solar panels) are reusable. The biggest upgrade is swapping a grid-tied inverter for a hybrid one and adding batteries. Plan your roof layout for the maximum panel count you'll ever want, even if you only install half now.
Component Deep-Dive
What Each Part Looks Like
Before diving into specs and brands, here is what you are actually buying — a visual map of every major component and where it lives in your home:
 Where every major component lives in your home — from rooftop panels down through cables to your indoor inverter, battery, and electrical panel.
You've picked a budget tier. Now it's time to understand what you're actually buying. Every solar system has four core components: panels, an inverter, batteries (optional), and mounting hardware. Each has a confusing landscape of brands, technologies, and price points — especially in the Philippine market where tiangge distributors, Facebook sellers, and official dealers all coexist.
This section cuts through the noise. We'll cover what actually matters in each category, show you real Philippine market pricing, and tell you where you'll overpay if you're not careful.
Solar Panels
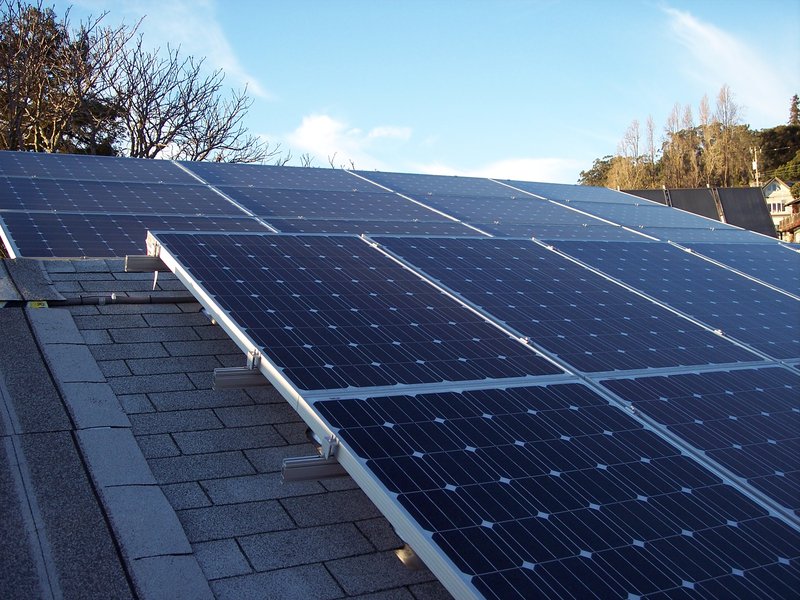
Solar panels mounted on a residential roof — the flat black rectangles you see on rooftops everywhere. Each panel weighs about 25kg and is roughly the size of a door.
Monocrystalline vs Polycrystalline
If a seller is pushing polycrystalline panels in 2025, walk away. Poly was the budget choice a decade ago — it's been completely displaced by mono in both price and performance.
| Type | What It Is | Pros | Cons | Verdict |
|---|---|---|---|---|
| Monocrystalline | Made from a single silicon crystal structure | Higher efficiency (20–23%), better low-light performance | Slightly higher price (but gap has nearly closed) | Buy this — the only sensible choice for new installs |
| Polycrystalline | Made from multiple silicon crystal fragments melted together | Cheaper to manufacture | Lower efficiency (15–17%), fades faster, outdated technology | Avoid — no longer makes economic sense |
All tier-conscious buyers today are looking at monocrystalline — the real question is which type.
Panel Cell Technologies
In 2026, N-type panels have captured over 60% of global production. PERC is being phased out. Here's every technology you'll encounter, ranked from budget to cutting-edge:
| Type | What It Is | Efficiency | Temp Coefficient | Degradation | PH Price Range | Verdict |
|---|---|---|---|---|---|---|
| PERC (Passivated Emitter Rear Cell) | Old mainstream — a reflective rear layer bounces unused light back through the cell | 20–22% | -0.35%/°C | ~0.5%/yr | ₱4,400-4,800/550W | Legacy — still sold but being replaced by N-type everywhere |
| N-Type TOPCon (Tunnel Oxide Passivated Contact) | Current standard — a special oxide layer dramatically reduces wasted energy inside the cell | 22–24% | -0.29%/°C | ~0.4%/yr | ₱5,700-7,500/585-620W | Best value — the sweet spot for most PH buyers in 2026 |
| HJT (Heterojunction Technology) | Premium — combines crystalline + amorphous silicon for the best heat handling | 23–24% | -0.24%/°C (best) | ~0.3%/yr | ₱8,000-12,000/430-450W | Best for PH heat — lowest power loss on 35°C+ days |
| IBC/HPBC (Interdigitated/Hybrid Back Contact) | All electrical contacts hidden on the back — front is pure unobstructed silicon | 23–24.5% | -0.27%/°C | ~0.35%/yr | ₱7,000-9,000+ | Highest efficiency — LONGi HPBC, SunPower Maxeon |
| ABC (All Back Contact) | Aiko's version of back-contact — zero grid lines on front, maximum light absorption | 24–25% (highest) | -0.26%/°C | ~0.35%/yr | ₱6,900-7,600/650W | Cutting edge — highest output per panel available in PH |
What does temperature coefficient mean for you?
Philippine rooftops hit 50-60°C. Every panel loses power as it heats up. The temperature coefficient tells you how much:
- PERC (-0.35%/°C): At 55°C roof temp, loses 10.5% of rated power
- TOPCon (-0.29%/°C): At 55°C, loses 8.7% — saves ~2% more than PERC
- HJT (-0.24%/°C): At 55°C, loses 7.2% — saves ~3.3% more than PERC
Over 25 years in PH heat, HJT produces ~8% more total energy than PERC from the same panel size. That's real money.
Other Design Features to Know
| Feature | What It Means | Why It Matters |
|---|---|---|
| Half-cut cells | Each cell is sliced in half — 120 or 144 half-cells instead of 60/72 full cells | Reduces power loss, better shade tolerance (if ONE half-cell is shaded, only half the panel drops — not the whole thing). Standard on all modern panels 500W+. |
| Multi-busbar (MBB/SMBB) | 9-16 thin wire ribbons across each cell instead of the old 3-5 thick busbars | Less silver used (cheaper), light hits more cell surface (higher efficiency), micro-cracks have less impact. Look for 9+ busbars. |
| Dual glass (glass-glass) | Glass on BOTH front and back instead of glass-front + plastic backsheet | More durable in humidity and salt air (important in PH coastal areas), required for bifacial, heavier (~28-32kg vs 25kg), longer warranty (often 30 years) |
| Shingled cells | Cells overlap like roof tiles instead of being spaced apart | Eliminates gaps between cells = more active area per panel. Slightly cheaper but less common in PH market. |
Monofacial vs Bifacial
Most panels 580W+ are now bifacial — they generate electricity from both the front AND back of the panel.
| Type | How It Works | Extra Output | Best For | Price Difference |
|---|---|---|---|---|
| Monofacial | Generates power from the front only | 0% (baseline) | Dark roofs, flat-mount installations | Standard price |
| Bifacial (dual glass) | Generates power from both sides — light reflects off the roof/ground and hits the back of the panel | +5-15% extra production | Light-colored roofs (white, silver GI sheet), elevated/tilt-frame mounts with gap underneath | +5-10% more per panel |
Bifacial on Philippine Metal Roofs
Most PH homes have silver/galvanized GI sheet roofing — this is actually ideal for bifacial panels because the shiny metal reflects sunlight onto the panel's back side. If your roof is dark (painted black/dark gray), the bifacial gain drops to only ~3-5%. On a silver GI roof with proper mounting gap (10-15cm), expect 8-12% extra output for free.
Brand Tiers and Philippine Pricing
Here are real prices from both retail (SRP from distributors/Lazada) and installer channels (sourced from Facebook Solar Pilipinas group, QC-area installers, April 2026):
| Brand | Wattage | Type | Installer Price | SRP (Retail) | Notes |
|---|---|---|---|---|---|
| JA Solar | 585W | Bifacial N-Type | ₱5,700 | ₱6,900 | Best value bifacial — widely available, proven track record |
| Sunket | 600W | Bifacial N-Type | ₱6,300 | ₱7,300 | Good mid-range option |
| Nuuko | 620W | Bifacial N-Type | ₱6,600 | ₱7,400 | Strong contender at 620W |
| Jinko | 620W | Bifacial N-Type | ₱6,700 | ₱7,500 | Premium Tier-1, best warranty |
| Aiko | 650W | ABC (All Back Contact) | ₱6,900 | ₱7,600 | Cutting-edge ABC cell tech — no grid lines, all-black, 25% efficiency |
| Trina Solar | 620W | Bifacial N-Type TOPCon | ~₱5,900 | ~₱6,500 | Vertex N series, strong brand |
| Trina Solar | 700-730W | Bifacial N-Type TOPCon | ~₱7,500-8,500 | ~₱8,500-9,500 | Vertex N 700+ series — largest residential panels available. 2.38m × 1.30m (~3.1 sqm). Best for large roofs. |
| Risen Energy | 700W | Bifacial HJT | ~₱8,000 | ~₱9,000 | HJT technology — best heat performance at 700W+ |
| Risen | 550W | Mono PERC | ~₱4,400 | ~₱4,800 | Budget option, older tech |
| REC | 430W | HJT | — | ₱9,000–12,000 | Top-tier, best-in-class 40yr warranty |
700W+ Panels — Do You Need Them?
Panels above 650W are physically larger (~3.1 sqm vs 2.79 sqm for 620W) and heavier (~35-38kg). They're ideal for large roofs (60+ sqm) where you want maximum power from fewer panels. For most PH residential roofs (30-50 sqm), the 620W panel remains the sweet spot — 700W panels are harder to handle during installation and may not fit standard mounting rail spacing.
Installer vs Retail Pricing
Installer prices are ₱700-1,200 cheaper per panel because they buy in bulk directly from distributors. If you're doing semi-DIY (buy parts yourself, hire electrician), join Facebook Solar Pilipinas and ask for installer pricing — many will sell panels even without an install contract.
Per-watt benchmarks: Expect ₱9-11/W at retail (SRP) and ₱8-10/W from installers. The savings from going through an installer for panels alone can be ₱7,000-12,000 on a 10-panel system.
Buying Direct vs Installer-Supplied
Many installers bundle panels at a fixed per-panel price with no line-item transparency. Ask for a bill of materials with model numbers before signing anything. You can then cross-check against Lazada, Shopee, or distributor price lists to understand the markup you're paying.
550W vs 620W — Which Panel Size?
If your roof space is limited (under 50 sqm usable), 620W N-Type TOPCon panels are worth the premium:
| Spec | 550W (PERC) | 620W (N-Type TOPCon) |
|---|---|---|
| Dimensions | 2,278 x 1,133 mm | 2,465 x 1,134 mm |
| Area per panel | 2.58 sqm | 2.79 sqm (8% larger) |
| Watts per sqm | 213 W/sqm | 222 W/sqm (4% denser) |
| Efficiency | 20-22% | 22-23.3% |
| Weight | ~28 kg | ~34.6 kg |
| Temp coefficient | -0.35%/°C | -0.29%/°C (better in PH heat) |
| Degradation | ~0.5%/yr | ~0.4%/yr |
| Price per panel (PH) | ₱4,500-5,000 | ₱5,700-6,500 |
The Real-World Advantage
On paper, 620W panels only give 2-4% more watts per sqm. But in Philippine heat (35°C+ roof temperatures), the better temperature coefficient adds ~3-5% real-world production. Combined with slower degradation (0.4% vs 0.5%/yr), you get ~7-8% more total energy over 25 years for ~17% more cost. On a space-constrained roof where you can't just add more panels, that's worth it.
Verdict: If your roof can fit 12+ panels of either size, go with 550W — cheaper per watt and the volume makes up the difference. If you're limited to 10-11 panels or fewer, go 620W N-Type TOPCon.
Roof Space Calculator
Use this calculator to estimate how many panels fit on your roof, your expected production, monthly savings, and payback period — all calculated live as you adjust the sliders.
Step 1: Measure your usable roof area
Your total roof area minus obstructions (vents, antennas, water tanks, AC units) and access gaps. Rule of thumb: usable area ≈ 70-80% of total roof.
How to Actually Measure Your Roof (Including Non-Flat Roofs)
Flat roof or very low pitch: Measure length × width from the ground using a tape measure. Or use Google Maps satellite view — right-click → "Measure distance" to trace your roof outline. It gives you the area.
Sloped / pitched roof (most PH homes): Your roof is NOT the same area as your floor plan — a sloped roof is larger because it's angled. To get the actual roof area:
- Measure the floor area under the roof (length × width = e.g., 8m × 5m = 40 sqm)
- Estimate the roof pitch (how steep it is):
| Roof Type | Typical Pitch | Multiplier | Example: 40 sqm floor |
|---|---|---|---|
| Nearly flat (GI sheet, slight slope) | 5-10° | × 1.01-1.02 | 40.4-40.8 sqm |
| Standard slope (most PH homes) | 15-25° | × 1.04-1.10 | 41.6-44.0 sqm |
| Steep slope (cathedral/A-frame) | 30-45° | × 1.15-1.41 | 46.0-56.4 sqm |
-
For gable roofs (two sloped sides meeting at a peak): Only ONE side faces the right direction for solar. Measure that side only, or use both if east-west facing.
-
Subtract obstructions: Walk your roof (or look at satellite) and subtract:
- Water tank: ~1.5 sqm
- Satellite dish: ~0.5 sqm
- Vent pipes: ~0.2 sqm each
- AC outdoor unit: ~1 sqm
- Edge clearance: 0.5m from all edges (safety + wind load)
-
Quick method: If you can't climb up, use Google Maps satellite → Measure tool. It measures the flat projection, so multiply by the pitch factor above.
Example: Typical Filipino Bungalow
- Floor area: 8m × 5m = 40 sqm
- Roof pitch: ~15° (standard GI sheet slope) → × 1.04 = 41.6 sqm actual roof
- Subtract: 1 water tank (1.5 sqm) + 1 AC unit (1 sqm) + edge clearance (~4 sqm) = 6.5 sqm
- Usable roof area: 41.6 - 6.5 = ~35 sqm
| Total Roof Area | Usable Area (~75%) | Max 550W Panels | 550W System | Max 620W Panels | 620W System |
|---|---|---|---|---|---|
| 20 sqm | ~15 sqm | 5 panels | 2.75 kWp | 5 panels | 3.10 kWp |
| 25 sqm | ~19 sqm | 7 panels | 3.85 kWp | 6 panels | 3.72 kWp |
| 30 sqm | ~23 sqm | 8 panels | 4.40 kWp | 8 panels | 4.96 kWp |
| 35 sqm | ~26 sqm | 10 panels | 5.50 kWp | 9 panels | 5.58 kWp |
| 40 sqm | ~30 sqm | 11 panels | 6.05 kWp | 10 panels | 6.20 kWp |
| 50 sqm | ~38 sqm | 14 panels | 7.70 kWp | 13 panels | 8.06 kWp |
| 60 sqm | ~45 sqm | 17 panels | 9.35 kWp | 16 panels | 9.92 kWp |
| 80 sqm | ~60 sqm | 23 panels | 12.65 kWp | 21 panels | 13.02 kWp |
Step 2: Estimate daily production
Multiply your system size by Philippine Peak Sun Hours (PSH):
| Location | PSH (avg) | 5.5 kWp Daily | 6.2 kWp Daily | 8 kWp Daily |
|---|---|---|---|---|
| Metro Manila | ~4.5 hrs | 24.8 kWh | 27.9 kWh | 36.0 kWh |
| Cebu | ~5.0 hrs | 27.5 kWh | 31.0 kWh | 40.0 kWh |
| Davao | ~4.8 hrs | 26.4 kWh | 29.8 kWh | 38.4 kWh |
| Palawan | ~5.2 hrs | 28.6 kWh | 32.2 kWh | 41.6 kWh |
| Baguio | ~4.0 hrs | 22.0 kWh | 24.8 kWh | 32.0 kWh |
These are ideal estimates
Real-world production is typically 75-85% of these numbers due to heat losses, inverter efficiency, shading, dirt, and cable losses. See the Solar Site Assessment section below for a detailed loss calculator.
Step 3: Example roof layout (40 sqm with 620W panels)
 A typical 40 sqm roof fits 10 × 620W panels in a 3-column layout with walkway access and room for a future 11th panel. Dimensions shown include mounting gaps.
What to Check on Panel Specs
Beyond cell technology and brand tier, always verify:
- Power Tolerance: Should be 0/+5W or better (positive-only tolerance). Avoid panels with negative tolerance (−3/+3W).
- Temperature Coefficient (Pmax): Lower is better. For tropical climates, target ≤ −0.35%/°C (TOPCon/HJT beats PERC here).
- Product Warranty: 12–15 years minimum. Top brands offer 25–30 years.
- Performance Warranty: 25–30 years at ≥80% output. Check the degradation curve, not just the headline number.
Inverters
A hybrid inverter (top) with a wall-mounted LiFePO4 battery (bottom). About the size of a small suitcase, mounted on your wall near your electrical panel. Image: Wikimedia Commons, CC BY-SA 4.0
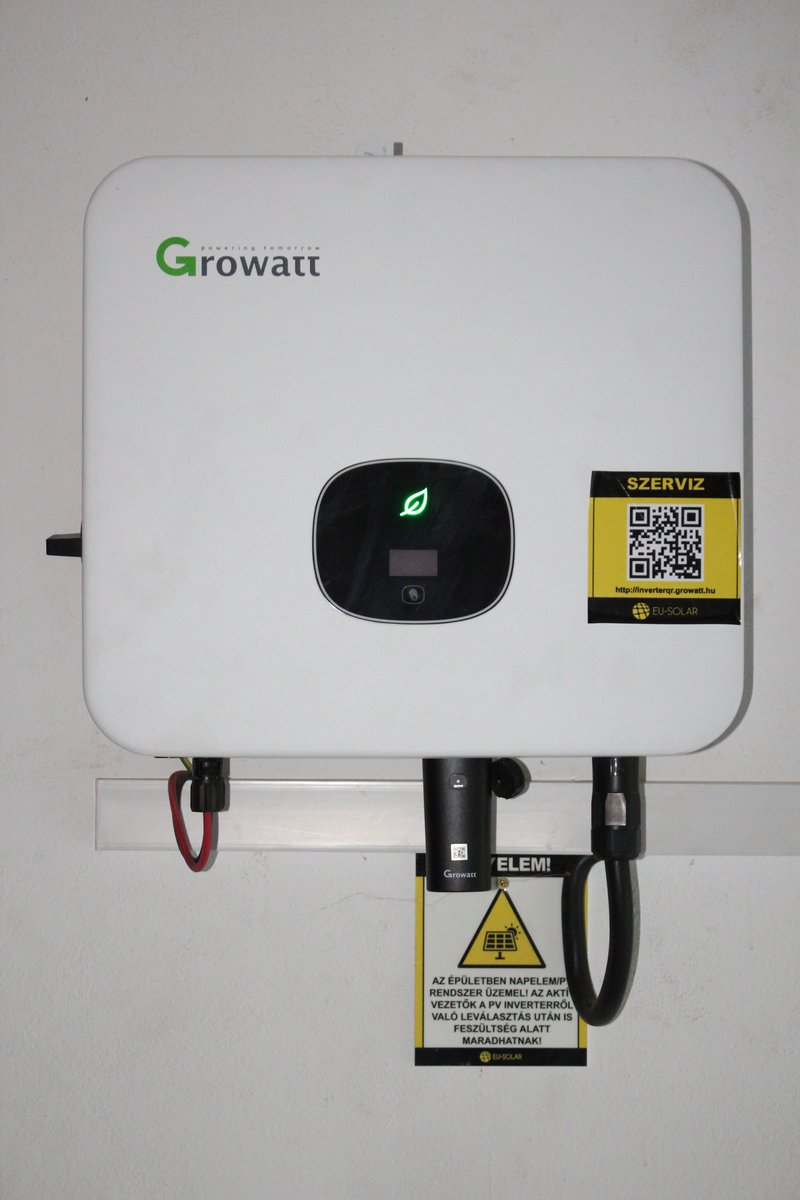 A Growatt string inverter — a popular budget choice in the Philippines. Image: Wikimedia Commons, CC BY 4.0
The inverter is the brain of your system — it converts DC power from the panels into AC power your home can use. It's also the component most likely to fail first and the one with the most homelab-relevant features (monitoring, grid interaction, battery management).
String vs Micro Inverters
| Type | What It Is | Pros | Cons | Verdict |
|---|---|---|---|---|
| String Inverter | One central box on your wall — all panels connect to it in a chain (called a "string") | Lower cost, simpler installation, easier to maintain and replace | Shading one panel reduces the whole chain's output | Best for most PH homes — shade is rarely an issue on typical rooftops |
| Microinverter | A small inverter attached to each individual panel on the roof | Each panel works independently (shade on one doesn't affect the rest), per-panel monitoring | Micro-inverters cost 2-3 times more than a single string inverter, and if one breaks, a technician needs to go up on the roof to fix it. Enphase is the main brand. | Only if you have serious shade problems — trees, neighboring buildings partially covering your roof |
 How panels wire together in "strings" — connected in series so voltage adds up, then both strings feed into the inverter's MPPT inputs. This is what "string inverter" means.
For most Philippine homes: string inverter.
Grid-Tied vs Hybrid
Grid-tied inverters export excess power to the grid (or curtail it if no net metering) and shut down during outages (for lineworker safety). Lower cost. No battery capability.
Hybrid inverters manage both grid and battery connections simultaneously. They can charge batteries from panels or grid, discharge batteries during outages or peak hours, and maintain critical loads when the grid goes down. Cost is typically 30–50% more than a comparable grid-tied unit.
If you want brownout backup capability — which is most Philippine homeowners — you want a hybrid inverter.
Brand Comparison
| Brand | Type | 5kW Price | HA Integration | Best For |
|---|---|---|---|---|
| Deye | Hybrid | ₱51–56K | HACS Solarman (local) | Best value PH hybrid |
| Growatt | Grid/Hybrid | ~₱50K | Native core (cloud) | Cost-effective |
| GoodWe | Grid/Hybrid | ~₱63K | Native core (local UDP) | Best native HA |
| Huawei SUN2000 | Hybrid | ~₱65K | HACS Modbus (local) | Most feature-rich HA |
| LuxPower | Hybrid | ₱50–96K | Community | Good alternative |
| Sungrow | Hybrid | ~₱55-70K | HACS (local Modbus) | Spotted in PH FB groups (6kW hybrid). Growing PH presence. |
| Fronius | Grid-tied | ~₱85K | Native core (local) | Premium European |
Home Assistant Integration
If you run Home Assistant (or plan to), inverter selection matters beyond price. GoodWe and Fronius offer local-network integrations with no cloud dependency. Deye/Solarman and LuxPower work via community HACS integrations with local polling. Growatt's official integration routes through the cloud. Huawei SUN2000 with a local RS485 Modbus connection is the most powerful but requires more setup.
Deye has become the dominant hybrid choice in the Philippine market — widely stocked by distributors, good community support, and competitive pricing. It's the safe default if you don't have specific HA integration requirements.
Inverter Technology Trends (2026)
| Innovation | What It Means | Status | Impact for PH Buyers |
|---|---|---|---|
| GaN semiconductors | Gallium Nitride chips replace silicon — inverters become smaller, lighter, and hit 99% efficiency (vs 96-97% today) | Available in microinverters (Enphase IQ9). Coming to string inverters. | Not critical yet for PH residential, but watch for GaN-based Deye/Growatt models in 2027 |
| SiC semiconductors | Silicon Carbide chips for high-power inverters — better heat handling and efficiency | Available in commercial inverters. Residential models emerging. | Relevant for 10kW+ systems — better performance in PH heat |
| AI-powered MPPT | Machine learning algorithms that predict shade patterns, weather, and optimize power extraction in real-time | Built into latest Huawei SUN2000, SolarEdge, and Enphase systems | Real benefit in PH — monsoon clouds and partial shade are common. AI MPPT adapts faster than traditional algorithms |
| Panel-level optimizers | Small boxes attached to each panel that optimize individually (like microinverters but cheaper) | SolarEdge is the leader. Tigo and Huawei also offer them. | Solve the shade problem — if one panel is shaded, only that panel drops, not the whole string. Worth it if you have partial shade. |
| Integrated EV charging | Inverters with built-in EV charger management — no separate charger controller needed | SolarEdge, Fronius, and Enphase offer integrated solutions | Still premium-priced. For PH, a separate go-e/OpenEVSE charger with HA automation is cheaper and more flexible. |
Batteries
 A wall-mounted LiFePO4 battery unit — this is where your solar energy gets stored for nighttime use or brownout backup. About the size of a small filing cabinet. Image: Wikimedia Commons, CC BY-SA 4.0
LiFePO4 Only
The battery chemistry question has a clear answer: Lithium Iron Phosphate (LiFePO4 / LFP) only. Do not let any installer talk you into lead-acid or older lithium chemistries for a new residential install.
Why LFP wins:
- 6,000+ cycle life (16+ years at daily cycling) vs 500–1,000 cycles for lead-acid
- No thermal runaway risk — LFP is stable at high temperatures. NCM/NCA lithium chemistries can ignite or explode under fault conditions.
- Deeper usable depth of discharge — 80–90% usable vs 50% for lead-acid
- Flat discharge curve — voltage stays stable until nearly depleted, meaning consistent inverter performance
- No maintenance — sealed, no water top-ups, no equalization charges
The extra upfront cost vs lead-acid pays back within 2–3 years in replacement cycle savings alone.
See what LiFePO4 batteries look like
- Server rack style: View on Lazada — flat rack-mount units that stack in a server cabinet
- Wall-mount style: View on Lazada — slim rectangular units bolted to the wall beside your inverter
Philippine Pricing (Lazada)
LFP batteries are now widely available on Lazada and Shopee. Pricing has dropped significantly. Real current listings:
| Product | Capacity | Price | Per kWh |
|---|---|---|---|
| James Watt 48V 100Ah | 5.12 kWh | ₱34,999 | ₱6,836/kWh |
| GENTAI 48V 100Ah | 5.12 kWh | ₱42,999 | ₱8,398/kWh |
| Humsienk 48V 100Ah | 5.12 kWh | ₱48,210 | ₱9,419/kWh |
| CST Energy wall-mount | 5.12 kWh | ₱53,800 | ₱10,508/kWh |
| DongJin wall-mount | 5.12 kWh | ₱54,999 | ₱10,742/kWh |
DIY Sourcing vs Installer Markup
Installer-supplied batteries typically run ₱13,500–25,000/kWh — 30–50% more than self-sourced Lazada pricing. If you can source and specify your own battery, you save significantly. The 48V 100Ah (5.12 kWh) format is standard and compatible with all major hybrid inverters. Just verify the BMS (Battery Management System — a built-in circuit board that protects the battery from overcharging, overheating, and over-discharging) brand (Daly, JBD, and JKBMS are all reputable) and confirm it communicates with your inverter via CAN bus or RS485 (communication protocols — basically the "language" the battery and inverter use to talk to each other).
Battery Technology Trends (2026)
| Technology | What It Is | Price | Availability | Should You Wait? |
|---|---|---|---|---|
| LFP (LiFePO4) | Current standard. Iron-based lithium. Safe, 6000+ cycles, proven. | ~$81/kWh globally (₱4,600/kWh wholesale) | ✅ Available now everywhere | No — buy now. This is the rational choice for 2026. |
| Sodium-ion (Na-ion) | Uses sodium instead of lithium — 40-60% cheaper raw materials, no cobalt/nickel, comparable to LFP performance at 150-160 Wh/kg | ~$60-70/kWh projected | ⚠️ CATL Naxtra launched 2025, residential products expected 2027-2028 | Wait if you can. Na-ion will be cheaper and more sustainable than LFP. But if you need a battery NOW, buy LFP. |
| Solid-state | Solid electrolyte instead of liquid — higher energy density, no fire risk, faster charging | Unknown (2-3× LFP initially) | ❌ 5-8 years from residential use | Don't wait. Too far out for residential. |
| Second-life EV batteries | Used EV batteries (70-80% capacity remaining) repurposed for home storage | 30-50% cheaper than new LFP | ⚠️ Available from some PH sellers on Facebook groups | Risky. No warranty, unknown cycle history, may fail sooner. Only if budget is very tight and you understand the risk. |
The Sodium-Ion Disruption
MIT Technology Review named sodium-ion batteries a top 10 breakthrough technology of 2026. CATL's Naxtra line claims 175 Wh/kg — matching LFP. When Na-ion hits residential in 2027-2028, expect battery prices to drop 30-40%. If you're installing solar NOW, buy LFP. If you're planning for 2028+, budget for Na-ion.
Sizing Your Battery Bank
A common mistake is over-building battery capacity hoping to go fully off-grid. The practical targets:
- 5 kWh: Powers essentials (lighting, fans, WiFi, phone charging, TV) for 4–6 hours through a typical brownout. Right-sized for most Tier 2 installs.
- 10 kWh: Full overnight coverage of a medium-consumption household. Also handles extended Meralco outages without generator backup.
- 15+ kWh: True off-grid resilience or high-consumption homes. Usually paired with 6–10 kWp of panels to meaningfully recharge daily.
Start with one battery and your hybrid inverter — most support stacking additional units via parallel connection. Expand when you have real consumption data from a monitoring season.
Mounting & Wiring
 Aluminum mounting rails bolted to a roof — panels slide into these tracks and get clamped down. Think of it like a shelf bracket system for your roof. Image: Wikimedia Commons, CC0
 MC4 connectors — waterproof snap-together plugs (like USB but for solar). They click together and lock. Every panel has a pair of these on the back. Image: Wikimedia Commons, CC0
Mounting is unglamorous but it determines whether your system survives Philippine weather for 25 years. Don't cut corners here.
Roof Type Considerations
Metal/GI Sheet Roofing — The most common Philippine roof type and the easiest for solar mounting. Self-drilling screws into purlins, flashing tape on penetrations, done. Most installers default to this and it works well.
Concrete Flat Roof — Requires ballasted or concrete-anchor mounting. Ballasted (weighted) systems avoid penetrations entirely — better for waterproofing. Anchor systems need proper sealing. Either works; ballasted is often preferred for rentals or situations where roof penetrations are a concern.
Clay/Concrete Tile — Requires tile hooks that slip under tiles without breaking them. More complex installation, higher labor cost, and more potential leak points. Ensure your installer has specific tile-roof experience.
Tilt Angle
The Philippines sits at roughly 5–20°N latitude depending on location (Metro Manila is ~14°N). Optimal fixed tilt for maximum annual production is approximately equal to your latitude — around 10–15° for most Philippine locations.
Most residential installs follow the existing roof pitch, which typically falls in this range. For flat roofs, a deliberate 10–15° tilt south-facing maximizes production and allows rain to self-clean the panels.
Grounding and Lightning Protection
Critical. Non-negotiable. The Philippines has one of the highest lightning strike densities in the world, and typhoon season brings sustained high winds alongside electrical activity.
Every properly installed system needs:
- DC grounding: All panel frames and mounting rails bonded to earth ground (connected to a metal rod driven into the soil — gives stray electricity a safe path to the earth instead of through a person)
- AC grounding: Inverter chassis and distribution panel (your circuit breaker box) ground bond
- Surge protection devices (SPDs) (small devices that absorb sudden voltage spikes from lightning or grid fluctuations — like a fuse but reusable): DC-side SPD between string and inverter; AC-side SPD at the inverter output
- Lightning arrester: Separate lightning rod system for rooftop installations (standard in commercial, increasingly common in residential)
 Surge arresters (SPDs) — these small devices protect your inverter from lightning-induced voltage spikes. Critical in Philippine typhoon season. Image: Wikimedia Commons, CC BY-SA 4.0
Ask your installer explicitly what grounding and SPD protection is included. Cheap installers skip this. It's a ₱3–8K line item that protects a ₱300–800K system.
DC Wiring and Safety Switches
- DC cables (thick red and black wires that carry power from panels to inverter): Use solar-rated (TUV/UL) twin-core 4mm² or 6mm² for string runs. Standard electrical wire is not UV-rated and will degrade on a hot rooftop.
See what DC solar cables look like
View on Lazada — thick red and black UV-resistant wires, sold per meter. These run from your rooftop panels down to the inverter.
- MC4 connectors (waterproof snap-together plugs — like USB but for solar panels, they click together and lock): Industry standard. Ensure proper crimping tools are used — hand-forced MC4 connectors are a fire hazard.
- DC isolator switch (an emergency shutdown switch for the solar panels — flip it and the panels stop sending power): Required at both the panel array and inverter. Allows safe disconnection of panels from the inverter for maintenance.
See what a DC isolator switch looks like
View on Lazada — a yellow or red rotary switch mounted near the inverter. You turn it to cut power from the panels for maintenance.
- Fire-rated conduit (protective tubing that wires run through): Where cables penetrate the roof or pass through living spaces, use fire-rated conduit. A DC arc fault can sustain combustion even after breaker trip because solar panels continuously produce power in daylight.
DC Arc Faults
Unlike AC circuits, DC faults from solar strings do not self-extinguish when a breaker opens. A high-resistance DC arc on poorly crimped or damaged cables can sustain 400–600V DC and start a rooftop fire. Proper wire management, quality MC4 connectors, and DC arc-fault circuit interrupters (AFCIs — a safety device that detects dangerous electrical arcs and cuts power automatically) are your protection. AFCIs are expensive (~₱8–15K) but increasingly available in quality hybrid inverters as a built-in feature — check your inverter spec sheet.
Quick Component Checklist
Before signing any installation contract, verify these items:
- Panel model, wattage, cell type, and warranty terms (product + performance)
- Inverter brand/model, hybrid vs grid-tied, battery compatibility
- Battery chemistry confirmed as LiFePO4, BMS brand, inverter communication protocol
- Mounting system: rail brand, anchor type, waterproofing method
- DC cabling: solar-rated, correct gauge for string voltage/current
- DC isolator switches at array and inverter
- Surge protection devices (DC and AC sides)
- Grounding scheme (panel frames, rails, inverter chassis, distribution board)
- Net metering application assistance (if applicable)
Where to Buy
| Platform | What to Search | Link |
|---|---|---|
| Lazada PH | "solar panel 550w", "deye hybrid inverter", "lifepo4 battery 48v" | Solar Panels / Inverters / Batteries |
| Shopee PH | Same searches | Solar Panels / Inverters / Batteries |
| AliExpress | Bulk orders, 2-4 week shipping | Solar Panels / Inverters |
| JFL Solar | PH distributor, wholesale pricing | jflsolar.com |
| Facebook Marketplace | "solar panel" — sometimes secondhand at big discounts | facebook.com/marketplace |
Jargon Decoder — What Sellers and Posts Actually Mean
When browsing FB groups, Lazada listings, or talking to installers, you'll hear technical terms. Here's what they actually mean:
Solar Panel Jargon
| Term | Plain English | Why Care |
|---|---|---|
| Voc | Max voltage when panel is disconnected (like water pressure with tap closed) | Must not exceed inverter's max input voltage |
| Isc | Max current the panel can produce | Determines fuse and wire sizing |
| STC | Lab test conditions (25°C) — NOT real PH conditions | Real output is always lower than STC rating |
| Pmax | The panel's wattage (e.g., 620W) | The number in the product name |
| Bifacial | Generates power from both front AND back | 5-15% bonus on reflective roofs |
| Half-cut | Cells sliced in half for better shade tolerance | Standard on all 500W+ panels |
| N-Type / P-Type | Silicon type. N-Type is newer and better | N-Type = higher efficiency, less degradation |
Inverter Jargon
| Term | Plain English | Why Care |
|---|---|---|
| MPPT | Brain that squeezes max power from panels | More MPPT inputs = handles different panel directions |
| String | Panels wired in series (daisy-chained) | Each MPPT handles one string |
| Anti-islanding | Auto-shuts off during brownouts to protect utility workers | Required by law for grid connection |
| Zero-export | Prevents sending power to grid (meter won't spin backward) | Need this if no net metering yet |
Battery Jargon
| Term | Plain English | Why Care |
|---|---|---|
| SOC | How "full" the battery is (like phone battery %) | Don't let it drop below 20% |
| DOD | How much you actually use (80% DOD = use 80%, keep 20%) | Higher DOD = more energy but shorter life |
| Cycle life | Charge/discharge cycles before 80% capacity | 6000+ = ~16 years daily cycling |
| BMS | Brain that protects battery from overcharge/fire | No BMS = fire risk. Must have. |
| CAN bus / RS485 | Communication cable between battery and inverter | Without it, inverter can't manage charging |
Wiring Jargon
| Term | Plain English | Why Care |
|---|---|---|
| MC4 | Waterproof snap-together connectors for solar panels | Buy genuine IP67-rated. Cheap fakes corrode. |
| mm² | Wire thickness (higher = thicker = less power loss) | 4mm² for panels, 6mm² long runs, 25mm² batteries |
| DC-MCB | Resettable fuse for DC side | DC and AC breakers are NOT interchangeable |
| SPD | Surge protector — absorbs lightning spikes | Critical in PH typhoon season |
| ATS | Auto-switches between grid and solar power | Seamless power source switching |
What to Look For When Buying
 Every component in a 6.2 kWp hybrid solar system with exact specs, wire sizes, and protection devices. Use this as your shopping checklist.
You've decided on your components — now here's what to check before handing over your money. These are the specs and red flags that separate a good purchase from an expensive mistake.
Solar Panels — What to Check
| Check | What to Look For | Red Flag |
|---|---|---|
| Brand & tier | Tier-1 manufacturer (Trina, JA Solar, Jinko, LONGi, Canadian Solar) | Unknown brand with no datasheet |
| Wattage rating | Match your plan (550W or 620W) — check the label on the back | "500W" panels that are actually 100W with inflated marketing |
| Cell type | Monocrystalline (mono). N-Type TOPCon for 620W+ | Polycrystalline (poly) — outdated technology |
| Warranty | 25-year performance warranty, 12+ year product warranty | No written warranty or warranty from a company that might not exist in 5 years |
| Datasheet | Ask for the official PDF datasheet — it has all real specs | Seller can't provide a datasheet |
| Physical inspection | No cracks, chips, yellowing, or scratches on the glass. Check the junction box on the back is sealed. | Visible damage, loose junction box, mismatched cells |
| Certifications | IEC 61215 and IEC 61730 (international safety standards) | No certification markings |
The Lazada/Shopee '500W Panel' Scam
Many online listings advertise "500W solar panels" for ₱479-698. These are NOT 500W panels — they're typically 30-50W panels with inflated wattage claims. A real 500W+ panel weighs ~28kg and costs ₱4,000+. If it weighs 2kg and costs ₱500, it's a portable phone charger, not a home solar panel. Always check the physical dimensions and weight.
Inverters — What to Check
| Check | What to Look For | Red Flag |
|---|---|---|
| Type | Hybrid (if you want battery), Grid-tied (if no battery) | "Modified sine wave" — this is for camping, not home solar |
| Power rating | Match your system: 5kW, 8kW, 10kW, etc. | Rating doesn't match your panel array size |
| MPPT inputs | 2 MPPT inputs minimum for residential (one per string) | Single MPPT for a large system |
| Battery voltage | 48V for LFP batteries (most common) | 12V/24V — these are small off-grid systems, not whole-home |
| WiFi/Monitoring | Built-in WiFi dongle for app monitoring. Check if it works with Home Assistant. | No monitoring capability — you're flying blind |
| Warranty | 5-10 year manufacturer warranty | Less than 5 years or no warranty |
| Anti-islanding | Must have anti-islanding protection (safety feature that shuts off during brownouts — required for grid connection) | No anti-islanding = not legal to connect to Meralco grid |
| Certifications | IEC 62109, Philippine ERC certification | No local certification |
Batteries — What to Check
| Check | What to Look For | Red Flag |
|---|---|---|
| Chemistry | LiFePO4 (LFP) ONLY — safest, longest life | Lead-acid (old tech), Lithium NMC (fire risk for home use) |
| Voltage | 48V nominal (matches most hybrid inverters) | 12V/24V unless you're building a small off-grid system |
| Capacity | 100Ah = 5.12 kWh per battery. Buy what you need for your backup hours. | Suspiciously cheap — may be used/recycled cells |
| BMS | Built-in Battery Management System with Bluetooth monitoring | No BMS = dangerous, no cell balancing |
| Cycle life | 6,000+ cycles at 80% DoD (Depth of Discharge) | Less than 3,000 cycles |
| Communication | CAN bus or RS485 port for inverter communication (the cable that lets the battery "talk" to the inverter) | No communication port — battery and inverter can't coordinate |
| Warranty | 5-10 year warranty | Less than 3 years |
Test Before You Buy
Ask the seller to show you the battery's Bluetooth app reading. A healthy new LFP battery should show:
- All cell voltages within 0.02V of each other (e.g., 3.28V, 3.29V, 3.28V, 3.30V)
- SOC (State of Charge) reading matches the voltmeter
- No error codes in the BMS
If cells are wildly unbalanced (e.g., 3.1V and 3.4V), the battery has bad cells.
Mounting & Wiring — What to Check
| Component | What to Look For | Red Flag |
|---|---|---|
| Mounting rails | Aluminum alloy (6005-T5), anodized for corrosion resistance. Length matches your panel layout. | Steel rails (rust in PH humidity), uncoated aluminum |
| Clamps | Mid-clamps and end-clamps sized for your panel thickness (typically 30-35mm) | Wrong thickness = panels can come loose in typhoon |
| MC4 connectors | IP67 rated (waterproof), genuine branded (Stäubli, Amphenol, or panel manufacturer's own) | Cheap unbranded MC4s — they leak water and corrode |
| DC cables | PV-rated, UV-resistant, 4mm² or 6mm² cross-section (the thickness of the copper inside). Red for positive, black for negative. | Regular household wire (not UV-rated, will crack on roof in 2 years) |
| DC isolator switch | Rated for your system's maximum voltage and current. Typically 600V DC, 32A for residential. Rotary type (twist to disconnect). | AC-rated switch used for DC — DC arcs differently and can start fires |
| Surge protector (SPD) | DC-rated SPD (Type 2), rated for your string voltage. Typically 600V DC for residential. | AC surge protector used on DC side — won't protect against lightning |
| Grounding wire | 6mm² or larger copper grounding wire, green/yellow insulation. Grounding rod: copper-bonded, 1.5m minimum length. | No grounding = your entire metal roof becomes a lightning hazard |
| Cable glands/conduit | UV-rated conduit for outdoor cable runs. IP65+ cable glands where cables enter the house. | Exposed cables with no protection — rain, rats, and UV will destroy them |
Wire Sizing Quick Reference
For beginners who don't know what "4mm²" means — here's a plain-language guide:
| What It Connects | Wire Size | Why This Size | Where to Buy |
|---|---|---|---|
| Panel to panel (in a string) | 4mm² PV cable | Handles up to ~30A. Comes pre-attached to most panels via MC4. | Usually included with panels |
| String to inverter (DC side) | 6mm² PV cable | Longer run = thicker wire to reduce power loss. UV-rated for roof. | Lazada: PV cable 6mm² |
| Inverter to battery | 25mm² battery cable | High current (up to 100A). Short run but thick wire required. | Lazada: battery cable 25mm² |
| Inverter to distribution board (AC side) | 3.5-5.5mm² THHN wire | Standard household AC wiring. Size depends on inverter output. | Any electrical supply shop |
| Grounding | 6mm² green/yellow | Connects all metal parts to earth ground. | Any electrical supply shop |
| EV charger circuit | 6mm² THHN (for 32A) | Dedicated circuit from DB to charger location. | Any electrical supply shop |
The Golden Rule of Wire Sizing
When in doubt, go ONE size thicker than the minimum. Thicker wire = less power loss = more energy reaching your home. The cost difference is small (₱500-1,000 more for a full system), but the efficiency gain lasts 25 years.
Home Assistant Integration
Your inverter is generating data every second — panel voltages, battery state-of-charge (how "full" your battery is, like a fuel gauge), grid import/export — and almost none of it reaches you unless you actively pull it in. Home Assistant turns that raw telemetry into dashboards, automations, and alerts. This section covers how to connect the most common hybrid inverters, build out the Energy Dashboard, and write automations that shift loads to match your solar curve.
Inverter HA Compatibility Matrix
Not all inverters are created equal from a Home Assistant perspective. Local integrations are strongly preferred over cloud APIs — they're faster (sub-second polling vs. 5-minute cloud lag), work when your internet is down, and don't depend on a vendor's server staying alive for the next 15 years.
| Inverter | Integration | Connection | Battery Control | Local? | Difficulty |
|---|---|---|---|---|---|
| GoodWe ET/EH | Native core | Local UDP :8899 | Yes | ✅ | Easy |
| Fronius | Native core | Local HTTP (SolarAPI) | N/A | ✅ | Easy |
| Huawei SUN2000 | HACS wlcrs/huawei_solar |
Modbus TCP :502/6607 | Full | ✅ | Medium |
| Deye/Sunsynk | HACS home_assistant_solarman |
Local Modbus via WiFi logger | Yes | ✅ | Medium |
| Growatt | Native core | Cloud API (5-min polling) | Limited | ❌ | Easy |
| SolarEdge | Native core | Cloud or Modbus TCP | Via Modbus | Partial | Medium |
PH Sweet Spot
Deye + Solarman = the cheapest hybrid inverter setup with full local Home Assistant control. Deye units (often sold under the Sunsynk brand) are widely available from Manila distributors and pair natively with the home_assistant_solarman HACS integration via the built-in WiFi data logger — no extra hardware required.
Premium Pick
Huawei SUN2000 = the most feature-rich HA integration available. Per-optimizer panel monitoring, full battery schedule control, and the most complete sensor set of any inverter in this comparison.
Huawei SUN2000 Deep-Dive
The Huawei SUN2000 earns its "premium pick" status through a genuinely unique feature: per-optimizer monitoring. Every panel gets a SUN2000 optimizer attached at the module, and each optimizer reports its own voltage, current, and power back through the inverter. Home Assistant exposes all of it.
Why this matters in practice: With per-optimizer monitoring, you can see that Panel #7 dropped 30% output — likely bird droppings, early-onset shading from a new tree, or a failing bypass diode. Without this level of data, you'd only notice a drop in your total daily yield and have no idea which panel to inspect. With optimizer-level data, you walk straight to the problem.
HACS setup: Install wlcrs/huawei_solar from HACS (Home Assistant Community Store). The integration is actively maintained and supports the full SUN2000 feature set.
Connection options:
- Port 502 — Standard Modbus TCP, used on most firmware versions
- Port 6607 — Used on newer firmware (2023+); some installers configure this by default
- Direct Ethernet — Connect a cable directly from your router or switch to the inverter's RJ45 port
- Via SmartLogger — Huawei's optional monitoring box; useful for multiple inverters or sites with long cable runs
Firmware: 2023+ firmware is recommended. Older firmware may not expose battery management registers or per-optimizer data.
Elevated installer permissions: By default, the SUN2000 integration exposes read-only monitoring. To unlock full battery control, you need to enter the installer-level password (provided by your installer or available in the Huawei FusionSolar documentation for your region). Once elevated, you gain:
- Force charge from grid during TOU off-peak windows (e.g., midnight–6 AM)
- Force discharge to load during on-peak hours to avoid buying expensive grid power
- Grid export limits (required if your utility caps feed-in)
- SOC management — set minimum and maximum battery levels to protect battery lifespan
Sensors exposed by the integration:
- Inverter output power and cumulative energy (daily/total)
- Battery SOC, charge power, discharge power, temperature
- Per-string MPPT data (Maximum Power Point Tracking — the inverter's built-in optimizer that squeezes maximum power from your panels; this shows voltage, current, and power per string)
- Per-optimizer voltage, current, and power for every panel
- Grid import power, grid export power
- Daily and total yield
Optimizer monitoring in action
After installing a mango tree that started shading the west side of your roof in the afternoons, you notice your 3–5 PM generation dropped by 400W compared to the same week last year. With per-optimizer data in Home Assistant, you can pull up a history graph for each panel and confirm that Panels 14, 15, and 16 on the west string are at 40% of their peers during that window. You trim the tree, generation recovers. Without optimizer data, you'd be guessing — or paying for an installer visit to test each panel manually.
 How your solar system connects to Home Assistant — inverter data via Modbus/WiFi, energy monitoring via Shelly EM, and solar forecasts from the cloud. HA processes it all into dashboards, automations, and notifications.
Energy Dashboard Setup
The Energy Dashboard is Home Assistant's built-in visualization for electricity flows. It requires sensors with state_class: total_increasing and a unit of kWh — it does not accept power sensors in watts. Most inverter integrations provide these automatically; for those that only expose power (W), see the Riemann Sum helper step below.
- Navigate to Settings → Dashboards → Energy
- Electricity Grid: Add your grid consumption sensor (energy imported from grid, kWh) and your grid return sensor (energy exported to grid, kWh). These are what your meter measures.
- Solar Panels: Add your solar production energy sensor. Must be
kWhwithstate_class: total_increasing. This sensor should represent total PV generation, not net export. - Home Battery: Add your battery charge energy sensor and battery discharge energy sensor separately. The dashboard uses both to calculate self-consumption accurately.
- Solar Forecast: Add a forecast source to see predicted generation overlaid on your actual. Two options:
- Forecast.Solar — Free, configures with your panel azimuth/tilt/kWp, reasonable accuracy
- Solcast — More accurate (uses satellite cloud imagery), free tier covers residential use (up to 10 forecasts/day)
- Riemann Sum helper: If your inverter integration only exposes power in watts rather than cumulative energy in kWh, you need to create a helper to convert. Go to Settings → Devices & Services → Helpers → Add Helper → Integration - Riemann sum integral. Set the input sensor to your power sensor (W), the method to "Left" or "Trapezoidal", and the unit prefix to "k". This creates a derived kWh sensor that the Energy Dashboard can consume.
Solar Automations
Once your inverter is in Home Assistant and your energy sensors are flowing, you can close the loop: automatically shift loads to match your solar production.
PV Excess Control (Recommended)
The PV Excess Control HACS integration is the most capable option for priority-based solar excess management. Rather than a simple on/off threshold, it maintains a priority queue of appliances and allocates excess solar intelligently:
- Priority levels 1–1000 — Assign relative priority to each appliance. High-priority loads (EV charging, water heater) get fed first; lower-priority loads (pool pump, dishwasher) only activate when there's sufficient excess after higher-priority devices are satisfied.
- Dynamic EV charging current — For EV chargers with adjustable current (OCPP or Modbus-compatible), PV Excess Control modulates the charge rate between 6 A and 32 A to absorb exactly the available excess without importing from the grid.
- Battery-aware modes:
- Battery First — Fill battery to target SOC before routing excess to appliances
- Appliance First — Run appliances from solar before sending excess to battery
- Balanced — Split excess between battery and appliances based on configurable ratio
- 24-hour solar forecast integration — Uses your Forecast.Solar or Solcast data to look ahead and decide whether to save excess now for a cloudy afternoon or spend it immediately.
Manual Automation Example
For simpler setups or one-off automations, standard HA YAML works well. The pattern below monitors grid power (negative = exporting, positive = importing) and controls a resistive water heater accordingly:
automation:
  - alias: "Turn on water heater when solar excess > 2kW"
    trigger:
      - platform: numeric_state
        entity_id: sensor.grid_power
        below: -2000
        for: "00:05:00"
    action:
      - service: switch.turn_on
        target:
          entity_id: switch.water_heater

  - alias: "Turn off water heater when importing"
    trigger:
      - platform: numeric_state
        entity_id: sensor.grid_power
        above: 200
        for: "00:02:00"
    action:
      - service: switch.turn_off
        target:
          entity_id: switch.water_heater
The for: duration prevents rapid cycling — the grid power must sustain the threshold for the specified period before triggering. Adjust the 5-minute/2-minute windows to match your inverter's response time and load's thermal mass.
Homelab-Specific: Shift Docker Workloads to Solar Peak
If you run a homelab alongside your solar system, you can time compute-heavy tasks to coincide with peak generation (typically 10 AM–2 PM). Examples:
- Plex transcoding — Trigger a library scan or pre-transcode job via HA's REST command to the Plex API when battery is above 80% and solar is above 3 kW
- Nightly backups — If backups normally run at 3 AM (grid power), shift the HA automation trigger to check for solar surplus first; fall back to the 3 AM window only if surplus hasn't materialized
- Docker image pulls — Use HA's shell command integration to run
docker compose pullon the homelab host when solar conditions are favorable
This requires the Home Assistant rest_command or shell_command integration and either API access to the relevant services or SSH access to the Docker host.
Notification Automations
A few high-value alerts to configure:
- Low battery SOC — Alert at 20% and 10% remaining, especially during cloudy multi-day periods, so you can manually shed loads before the battery cuts out
- Daily production summary — Send a message at sunset with total kWh generated, total imported, total exported, and net grid cost; useful for tracking against monthly estimates
- Inverter fault — Alert immediately if inverter reports a fault code; some faults (arc detection, ground fault) require prompt action
For notifications, the Gotify and Discord integrations work well in a self-hosted homelab context. Configure them under Settings → Integrations and use the notify.gotify or notify.discord service in your automation actions.
Energy Monitoring Hardware
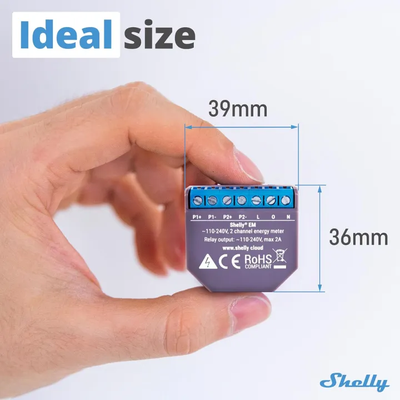 A Shelly EM energy monitor — this tiny device (39mm x 36mm) fits inside your electrical panel and monitors your entire home's energy consumption via WiFi. It connects to Home Assistant locally with no cloud required. Photo: Lazada PH
 Where to install CT clamps inside your electrical panel — one on the grid feed wire (measures import/export) and one on the solar inverter output (measures production). No cutting or splicing required.
Some inverters — particularly string inverters without a hybrid module — don't report full household consumption data, only generation. To track what your house is actually consuming and get accurate import/export figures, you need a dedicated energy monitor at the distribution board.
| Device | Channels | Connection | Price | Best For |
|---|---|---|---|---|
| Shelly EM | 2 CT clamps | WiFi (local HTTP/MQTT) | ~₱2,000 | Grid monitoring, single-phase homes |
| Shelly Pro 3EM | 3 CT clamps | WiFi/Ethernet (local) | ~₱4,500 | Three-phase connections, professional installs |
| Emporia Vue Gen 3 | 19 channels | WiFi (ESPHome flashable) | ~₱5,500–8,500 | Circuit-level monitoring across entire DB |
Shelly EM is the entry point: two CT clamps let you measure grid import/export at the main breaker. Local API and MQTT support means no cloud dependency, and it integrates natively with Home Assistant.
Shelly Pro 3EM handles three-phase supplies — common in Philippine homes with larger solar installations (above 5 kWp) or three-phase air conditioning. DIN-rail mounted, Ethernet port for wired reliability, and still fully local.
Emporia Vue Gen 3 is the circuit-level option. With 19 CT channels you can monitor every major circuit in your distribution board individually: air conditioning, appliances, lighting, EV charger, and the solar feed all get their own sensor. The Gen 3 hardware can be flashed with ESPHome firmware for full local control without the Emporia cloud account.
What do these look like? (click to see product photos)
- Shelly EM: View on Lazada — a small rectangular module (~5cm wide) that clips onto a DIN rail inside your electrical panel. Two CT clamp cables plug into it — these are donut-shaped clips that go around your main power wire without cutting it.
- Shelly Pro 3EM: View on Lazada — a wider DIN-rail module with 3 CT clamp inputs and an Ethernet port. Professional-grade, typically installed by an electrician.
- Emporia Vue Gen 3: View on Amazon — a compact hub (~10cm) with a bundle of 16 thin CT clamp cables that fan out like an octopus inside your electrical panel. Each clamp clips around one circuit's wire.
- What's a CT clamp? A "current transformer clamp" is a hinged plastic donut that clips around a wire — it measures how much electricity is flowing through without needing to cut or splice anything. Think of it like a clip-on microphone but for electricity. View CT clamps on Lazada
Installation note
CT clamp monitors (small clip-on sensors that measure electricity flowing through a wire without touching the wire itself) are non-invasive — they clip around the cable without breaking the circuit. However, installation inside a distribution board (your circuit breaker box) should be done by a licensed electrician (PEC 2017 compliance). The monitoring hardware itself is safe to configure and connect to Home Assistant yourself once physically installed.
EV Charging with Solar
If you're planning to own an EV — or already do — your solar install becomes dramatically more valuable. Charging at home with your own solar power is effectively free fuel. This section covers which chargers play well with Home Assistant, how to dynamically route excess solar into your car battery, and why you should wire for EV charging right now even if you don't own one yet.
Philippine EV Context
The PH EV market is growing steadily. More models are landing — from BYD and MG to local conversions — and the government has been pushing EV adoption through tax incentives and charging infrastructure programs. That said, public DC fast charging is still concentrated in Metro Manila and a handful of provincial highways. Outside those corridors, Level 2 home charging is the practical standard.
Level 2 means single-phase AC charging at 3.3–7.2 kW. Most Philippine EVs support it. A full charge on a typical EV (50–70 kWh battery) takes 7–12 hours overnight — which is fine when you're sleeping and your solar isn't producing anyway.
One thing to factor into your system sizing: an EV adds roughly 200–300 kWh/month to your household consumption, depending on driving distance. That's the equivalent of running two mid-size air conditioners. If you're sizing a new solar system with EV charging in mind, model this load explicitly — it can shift you from a 6 kWp recommendation to 8–10 kWp.
Charger Recommendations for PH + HA
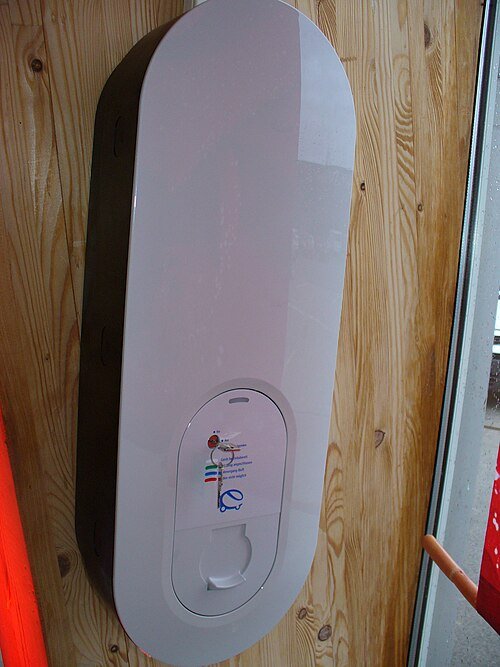 A residential EV wallbox — a compact wall-mounted box installed in your garage or carport. Plugs directly into your car. Image: Wikimedia Commons, CC BY-SA 3.0
Not all Level 2 EV chargers are equal when it comes to Home Assistant integration and solar-aware charging. Here are the top options ranked for the Philippine homelab context:
| Rank | Charger | HA Integration | Local Control | Solar Excess | Price (Est.) | Notes |
|---|---|---|---|---|---|---|
| 1 | go-e Charger | HACS | ✅ MQTT / HTTP / Modbus | Built-in surplus mode | ~₱30–45K | Community #1 pick for HA solar |
| 2 | OpenEVSE | Native core | ✅ WiFi API | Via HA automation | ~₱25–35K | Open-source, ESP32-based, hackable |
| 3 | Any OCPP charger | HACS OCPP | Varies | Via SolarCharger HACS | Varies | Most flexible — broad hardware support |
| 4 | Zappi (myenergi) | HACS | Via myenergi hub | Native Eco / Eco+ modes | ~₱50–70K | Best out-of-box solar divert, no HA needed |
See what EV wallboxes look like
- go-e Charger: View on official store — compact white box (~30cm), mounts on wall or pedestal
- OpenEVSE: View on official store — open-source ESP32-based charger
These are wall-mounted boxes about the size of a small book, installed in your garage or carport.
go-e Charger is the community favourite if you're already running Home Assistant. Its local API is well-documented, latency is low, and the built-in surplus charging logic means you can have it working without writing a single automation — though you'll want HA to fine-tune it.
OpenEVSE is the pick for tinkerers. It's fully open-source (hardware and firmware), runs on ESP32, and exposes a clean WiFi API. HA has native core support. Solar excess routing requires a simple power-monitoring automation, but the community templates are mature.
OCPP chargers are the safest bet if you want hardware flexibility. The HACS OCPP integration covers a wide range of brands. Pair with the SolarCharger HACS integration for multi-EV solar scheduling.
Zappi from myenergi has the most polished built-in solar divert (Eco and Eco+ modes work without HA), but it's the priciest option and requires a hub for full remote control. Good choice if you'd rather not automate.
Solar Excess EV Charging
The core idea: instead of exporting surplus solar to the grid (often at a terrible feed-in rate), you route that power into your car.
How it works with PV Excess Control (HACS):
- Your solar inverter and grid meter expose real-time power readings to Home Assistant.
- PV Excess Control monitors grid export continuously (every 5–10 seconds).
- It dynamically adjusts the charger's current setpoint — between the 6A minimum and 32A maximum allowed by Level 2 — to absorb available surplus.
- When a cloud passes and solar drops, the current steps down. When the sun returns, it steps back up.
Example scenario:
5 kW of solar excess → charger commanded to ~22A (single-phase, 230V) → ~5 kW flows into the car → zero grid import during charging
The SolarCharger HACS integration extends this further with:
- Multi-EV support — priority ordering when two cars are home
- Deadline-based charging — "reach 80% by 7:00 AM regardless of solar" for work days
- Sun elevation triggers — start charging only when the sun clears your roof angle and production is reliable
The practical result: in a well-sized system (8+ kWp), you can often charge 20–30 kWh into the car on a clear day using nothing but solar surplus — effectively driving on sunshine.
How Solar EV Charging Flows Through the Day
The diagram below shows a typical day with a 6 kWp system and a VinFast VF3. Notice how the EV charging slot fits neatly inside the solar production window — the car runs entirely on sunshine with zero grid draw:
 Solar production (yellow) peaks around noon. The VF3 charges (teal block, 10 AM–2 PM) using excess solar. Remaining surplus charges the battery (green) in the afternoon. A small grid import (red) handles evening loads after sunset.
Real EV Examples: Sizing Your Solar for Philippine EVs
Here are two popular EVs available in the Philippines and exactly what solar system you need to charge them:
VinFast VF3 — The Easy Match
| Spec | Value |
|---|---|
| Battery | 18.64 kWh |
| Range | ~210 km |
| Level 2 charge time | ~5 hours (10-100%) |
| Level 2 charging draw | ~3.3 kW |
| DC fast charge | 36 min (10-70%) |
| PH Price | ₱605,000+ |
The VF3's small battery makes it a perfect match for residential solar. At only 3.3 kW draw, it's less than an inverter aircon — even a 5 kWp system handles it easily.
Daily solar charging scenario (6 kWp system):
| Time | What's Happening |
|---|---|
| 8:00 AM | Solar starts producing, powers home loads |
| 10:00 AM | Excess solar (~3-4 kW) starts charging VF3 via PV Excess Control |
| 1:00 PM | VF3 gains ~10 kWh in 3 hours = ~110 km range |
| 2:00 PM | VF3 fully charged, remaining solar charges battery |
| Daily fuel cost: ₱0 |
Minimum system: 5 kWp + 5kW inverter — the VF3 is effortless.
Geely EX2 — Needs More Headroom
| Spec | Value |
|---|---|
| Battery | 39.4 kWh (2x the VF3) |
| Range | ~325 km (WLTP) |
| Level 2 charge time | ~6.5 hours |
| Level 2 charging draw | ~6.1 kW |
| DC fast charge | 25 min (30-80%) |
| PH Price | ₱950,000-1,050,000 |
The EX2 draws 6.1 kW on Level 2 — almost double the VF3. This changes the inverter sizing:
| Inverter Size | EX2 (6.1 kW) + Home Loads (2-3 kW) | Verdict |
|---|---|---|
| 5 kW | ❌ 8-9 kW needed, inverter maxed out | Won't work |
| 8 kW | ⚠️ Works but tight — stagger heavy loads (no aircon while charging) | OK with PV Excess Control managing loads |
| 10 kW | ✅ Comfortable headroom | Recommended for EX2 |
Daily solar charging scenario (6.2 kWp system + 8kW inverter):
| Time | What's Happening |
|---|---|
| 8:00 AM | Solar starts, powers home |
| 10:00 AM | Peak solar (~5-6 kW), PV Excess Control starts EV charging |
| 10:00 AM | HA automation turns off aircon, redirects power to EV |
| 1:00 PM | EX2 gains ~18 kWh in 3 hours = ~150 km range |
| 2:00 PM | EV charging pauses, aircon resumes, battery charges |
| Daily fuel cost: ₱0 (with smart load management) |
VF3 vs EX2 for Solar Owners
The VF3's 18.64 kWh battery charges fully from a few hours of solar — perfect for daily city driving. The EX2's 39.4 kWh gives more range but demands more from your solar system. If you're buying an EV specifically to pair with solar, the VF3 is the easier match. If you need 300+ km range, budget for a 10kW inverter with the EX2.
Quick Reference: Solar System Size per EV
| EV Model | Battery | L2 Draw | Min Inverter | Recommended System |
|---|---|---|---|---|
| VinFast VF3 | 18.64 kWh | 3.3 kW | 5 kW | 5-6 kWp + 5kW hybrid |
| Geely EX2 | 39.4 kWh | 6.1 kW | 8 kW | 6-8 kWp + 10kW hybrid |
| BYD Dolphin | 44.9 kWh | 7 kW | 8 kW | 8+ kWp + 10kW hybrid |
| Tesla Model 3 | 60 kWh | 7.4-11 kW | 10 kW | 10+ kWp + 12kW hybrid |
Bidirectional Charging — Your EV as a Home Battery (V2H/V2G)
The biggest EV charging innovation of 2026: your car can power your house during brownouts.
| Technology | What It Does | How It Works |
|---|---|---|
| V2L (Vehicle-to-Load) | Powers small appliances directly from your EV's charging port | Plug in a fan, laptop, or fridge directly to the car. Most EVs support this already. |
| V2H (Vehicle-to-Home) | Your EV battery powers your entire house during a brownout | Requires a bidirectional charger. Your EV's 40-60 kWh battery becomes a massive home backup — 10× bigger than a typical home battery! |
| V2G (Vehicle-to-Grid) | Your EV sells electricity back to the grid during peak demand | Still experimental in PH. In other countries, this earns $120-400/year in demand response payments. |
What This Means for Philippine Solar Owners
Imagine: it's a brownout, your 5 kWh home battery is running low, but your Geely EX2 has 30 kWh still in its battery. With V2H, your car powers your house for 10+ hours — no generator needed.
Available bidirectional chargers (2026):
| Charger | V2H Power | V2G | Price | Status |
|---|---|---|---|---|
| Wallbox Quasar 2 | 12.5 kW discharge | Yes | ~$4,000-5,000 | Available internationally |
| Enphase IQ Bidirectional | 11.5 kW discharge | Yes | ~$3,500-4,500 | Expected 2026 |
| SolarEdge Bidirectional | TBD | Yes | ~$12,000-15,000 | Expected late 2026 |
PH Availability
Bidirectional chargers are NOT yet widely available in the Philippines. The technology requires your EV to support it (VinFast VF3 does NOT — the Geely EX2 status is unconfirmed). Check with your EV manufacturer before investing. For now, a standard L2 charger + separate home battery is the reliable approach.
Future-Proofing
Even if you can't use V2H today, wire your EV charger circuit for bidirectional capability (larger wire gauge, dedicated sub-panel). When V2H chargers become available in PH, you'll be ready without rewiring.
Future-Proofing Your Installation
Wire Now, Charge Later
Pre-wire a dedicated 40A circuit (a dedicated heavy-duty power line — your installer runs new wires from your electrical panel to the charger location) from your distribution board (your circuit breaker box) to your garage or carport today, even if you don't own an EV yet. The cost difference is dramatic.
| Timing | Scope | Estimated Cost |
|---|---|---|
| During solar install or new construction | Wire + 40A breaker, conduit (protective tubing that wires run through) to garage | ₱5,000–10,000 |
| Retrofit later (wall breaking, new conduit, electrician revisit) | Same end result, far more labour | ₱20,000–40,000 |
The wall is already open when your solar installer is on-site. Adding a conduit run costs almost nothing at that point. Doing it later means breaking walls, running new conduit through finished surfaces, and paying an electrician's minimum callout on top of materials.
Two more considerations when future-proofing:
- Inverter headroom — A Level 2 charger draws up to 7.2 kW. If your inverter is already near its rated AC output, adding EV charging will either trip protection or force the charger to throttle down. Size your inverter with at least 7.2 kW of headroom above your expected household peak load.
- Panel capacity — Your main distribution board (circuit breaker box) needs a free 40A breaker slot and sufficient total ampacity (the total amount of electricity it can handle). If you're already running heavy loads (multiple air cons, water heater, inverter AC output), verify the main breaker rating before adding EV charging. Your home's main electrical capacity (think of it like water pressure — you need enough flow for all your appliances plus solar plus the EV charger): a 100A main is often tight; 150–200A gives you room.
Summary
EV charging turns your solar install from a bill-reduction tool into a genuine energy ecosystem. The best chargers for the Philippine HA setup are go-e Charger (easiest solar integration) and OpenEVSE (most hackable). Dynamic surplus charging via PV Excess Control can route 20–30 kWh of free solar into your car on a good day. And whatever you do — run that 40A conduit (protective tubing for the EV charger wiring) now while the walls are open.
Installation Guide
You've picked your system size, chosen your components, and set your budget. Now someone has to actually put it all together. This section covers who should do it, what your roof needs to handle it, and what the full process looks like from first drill hole to net metering approval.
You Don't Need to Be an Electrician
Your installer or licensed electrician handles all the technical wiring. This section helps you understand what they're doing and what to expect — you don't need to memorize any of this.
Solar Site Assessment — Can Your Roof Handle Solar?
Before spending a single peso, check these five factors. Each one affects how much energy your system actually produces.
1. Roof Orientation (Direction)
Your roof's direction determines how much sunlight your panels receive:
| Direction | PH Effectiveness | Notes |
|---|---|---|
| South-facing | ✅ 100% (ideal) | Maximum sun exposure all day. Philippines is in the northern hemisphere — south-facing roofs get the most direct sunlight. |
| East-facing | ⚠️ ~85% | Good morning production, weaker afternoon. Still viable. |
| West-facing | ⚠️ ~85% | Weaker morning, good afternoon production. Still viable. |
| North-facing | ❌ ~60-70% | Least sun exposure. Usually not recommended unless you have no other option. |
| Flat roof | ✅ ~95% | Use tilt frames angled south at 10-15°. Very common in PH. Almost as good as south-facing. |
How to check your roof direction
Open Google Maps on your phone, find your house, and note which direction your roof slopes face. North is always up on Google Maps. Alternatively, use a compass app on your phone — stand facing your main roof slope and read the direction.
2. Shade Analysis (Critical)
Shade is the #1 system killer. Even partial shade on ONE panel can reduce your ENTIRE string's output by 30-70%.
What to check: - [ ] Neighboring buildings — will they cast shadows on your roof? At what time of day? - [ ] Trees — especially growing trees that may shade your roof in 2-5 years - [ ] Water tanks, antennas, satellite dishes on YOUR roof - [ ] Power lines or poles near your roof line - [ ] Future construction — could the empty lot next door become a 3-story building?
How to test yourself:
The Shadow Test
Go to your roof (or observe it from the ground) at three times:
- 9:00 AM — Check for morning shadows
- 12:00 PM — Check for midday shadows (this is peak production time)
- 3:00 PM — Check for afternoon shadows
If any area has shade during 10 AM - 2 PM (your peak production window), avoid placing panels there. Take photos with timestamps — show these to your installer.
Shade loss estimates:
| Shade Situation | Production Loss | Impact |
|---|---|---|
| No shade (10 AM - 2 PM) | 0% | ✅ Ideal |
| Light shade (tree dappling) for 1 hour | 5-10% | ✅ Acceptable |
| Partial shade (building shadow) for 2 hours | 15-25% | ⚠️ Significant — consider microinverters |
| Heavy shade (building blocks sun) for 3+ hours | 30-50% | ❌ Major issue — relocate panels or reconsider |
| Panel-level shade (antenna/vent on one panel) | 20-40% per string | ❌ Move the obstruction or use microinverters |
Future Shade Risk
That empty lot next to your house? If someone builds a 3-story building there, it could shade your panels for half the day. Consider:
- The maximum building height allowed in your area (check with your barangay/LGU)
- Whether neighboring lots are likely to be developed
- Placing panels on the side of your roof AWAY from potential future construction
Interactive Shadow Simulator
3D Solar Simulator
The interactive 3D shadow simulator requires a web browser. Open the guide online to use it, or use the manual shade assessment checklist above.
See how shadows affect solar panels on YOUR roof throughout the day. Drag the time slider to watch shadows move — panels turn yellow/red when shaded, and the power output drops in real-time.
How to measure your inputs
House facing (front door direction): Stand at your front door facing outward. Use a compass app on your phone (or Google Maps — north is always up) and note the direction you're facing. That's your "Front door faces" value.
House size (width x depth): Measure your roof from above using Google Earth — right-click to measure distance. Or pace it out: one adult step ≈ 0.75m. Width = the side parallel to the street, Depth = front to back.
Usable area %: Not all roof space can hold panels. Subtract areas blocked by water tanks, vents, antennas, AC units, stairwell access, or roof edges (0.5m setback required). Typical Philippine homes: 60-80% usable. If your roof is clear with no obstructions, use 80-90%.
Neighboring buildings: Estimate height by counting floors (1 floor ≈ 3m). Estimate distance from your roof edge by pacing or using Google Earth. Place them in the simulator to see their shadow impact.
3. Roof Structural Capacity
Each 550-620W panel weighs 28-35 kg. A 10-panel system adds 280-350 kg to your roof, plus mounting hardware (~50 kg).
| Roof Type | Typical Capacity | Notes |
|---|---|---|
| Metal/GI sheet (standard PH) | ✅ Usually sufficient | Most common. Ensure purlins (the metal bars under the roof) are spaced every 60-80 cm. |
| Concrete flat roof | ✅ Strong | Best structural support. Use tilt frames. |
| Tile roof | ⚠️ Check carefully | Tiles can crack under mounting brackets. May need specialized mounting. |
| Old wooden truss (pre-2000) | ⚠️ Get assessed | May need reinforcement. Budget ₱15-30K for structural upgrades. |
How to check
If you can walk on your roof without it flexing or sagging, it can probably support panels. But for peace of mind, ask your installer to inspect the purlins and truss system. A structural assessment costs ₱2,000-5,000 and is worth it for roofs older than 15 years.
4. Sun Hours Calculator
Estimate your actual daily solar production using this formula:
Daily Production (kWh) = System Size (kWp) × Peak Sun Hours × System Efficiency (0.78)
The 0.78 efficiency factor accounts for all real-world losses:
| Loss Type | Typical Loss | Explanation |
|---|---|---|
| Heat (temperature) | 8-12% | PH rooftops hit 50-60°C. Panels lose ~0.35%/°C above 25°C. |
| Inverter efficiency | 3-5% | Converting DC to AC isn't 100% efficient. |
| Cable/wiring losses | 1-3% | Longer cable runs = more loss. Keep cables short. |
| Dust/dirt | 2-5% | PH air quality varies. Rain cleans most of it. |
| Shade (if any) | 0-25% | See shade analysis above. |
| Panel mismatch | 1-2% | Slight manufacturing differences between panels. |
| Total typical loss | ~22% | That's why we use 0.78 efficiency |
 Real-world solar systems lose about 22% of their rated output. Here's where it goes — heat is the biggest factor in Philippine climate.
Example for your 6.2 kWp system in Metro Manila:
6.2 kWp × 4.5 PSH × 0.78 = 21.8 kWh/day (real-world)
vs. ideal: 6.2 × 4.5 = 27.9 kWh/day
That 21.8 kWh/day = ~654 kWh/month. At ₱13/kWh, that's ₱8,500/month savings.
5. Pre-Assessment Checklist
Before contacting any installer, complete this checklist:
- Measured roof area (length × width of usable sections, in meters)
- Identified roof direction using Google Maps or compass app
- Performed shadow test at 9 AM, 12 PM, and 3 PM — took photos
- Checked for future shade risks (empty lots, growing trees)
- Inspected roof condition (age, material, any visible sagging or damage)
- Located your electrical panel (the gray box with circuit breakers) — is there wall space nearby for an inverter?
- Checked 3 months of electricity bills — noted average monthly kWh consumption
- Identified where to mount battery (if going hybrid) — needs ventilated area, not direct sunlight
- Identified EV charger location (if applicable) — garage/carport with wall space
DIY vs Installer vs Semi-DIY
There are three realistic approaches, each with different cost, risk, and effort profiles:
| Approach | Cost Savings | Warranty | Permits | Safety | Best For |
|---|---|---|---|---|---|
| Full-service installer | 0% (baseline) | Full | Handled | Professional | Hands-off buyers |
| Semi-DIY (recommended) | 30–40% | Partial (component warranty) | You handle | Licensed electrician | Budget-conscious + technical |
| Full DIY | 40–50% | Component only | You handle | Your responsibility | Experienced electricians only |
Electrical Safety Warning
Solar systems operate at voltages that can kill you and currents that can burn your house down. Even experienced IT professionals should hire a licensed electrician for the DC wiring and grid connection. The savings from full DIY are not worth the risk.
The semi-DIY approach is the sweet spot for most technically capable homeowners: you source your own components (saving 30–40% on markup), handle the physical mounting yourself, and hire a licensed electrician for all wiring and grid connection work. You get significant cost savings without taking on the electrical risk.
"The energies you are dealing with here are well beyond the KILL YOU and BURN YOUR HOUSE DOWN territory." — u/Dragnier84
Roof Assessment
Before anything goes on your roof, the roof itself needs to be evaluated across four dimensions:
- Structural load: Each panel weighs ~25kg. A 10-panel system adds 250kg to your roof. Most Philippine metal roofs handle this fine, but older or weaker structures may need reinforcement (₱15–30K). When in doubt, have a structural engineer assess it.
- Orientation: South-facing is ideal in the Philippines (we're in the northern hemisphere, so south-facing catches the most sun). East/west-facing works but yields roughly 15% less energy. North-facing is poor and should be avoided if alternatives exist.
- Shade analysis: This is critical and often underestimated. Shade on ONE panel in a string drops the ENTIRE string's output — not just that panel. Walk your roof at different times of day and check for: trees (especially ones that will grow), neighboring buildings, water tanks, satellite dishes, and roof protrusions. Even a small shadow from a cable at noon can cost you 20–30% of daily output.
- Tilt angle: Roughly 10–15° is optimal for Philippine latitude (~14°N). Most corrugated metal roofs already have sufficient tilt built in. Flat concrete roofs need tilt frames (₱3,000–8,000 per frame), which add cost but also improve airflow under panels — keeping them cooler and more efficient.
Installation Costs
Labor and ancillary costs that don't show up in component quotes:
| Item | Cost Range |
|---|---|
| Labor per kW (metal roof) | ₱7,000–20,000 |
| Labor per kW (tile/complex roof) | ₱12,000–25,000 |
| Electrical panel upgrade (upgrading your home's main electrical capacity — think of it like water pressure: 100A is like a standard garden hose, 200A is like a fire hose — you need enough capacity for all your appliances plus solar) | ₱10,000–25,000 |
| Roof reinforcement (if needed) | ₱15,000–30,000 |
| Permits + interconnection | ₱5,000–8,000 |
| Annual maintenance contract | ₱3,000–6,000/year |
Labor rates vary significantly by region — Metro Manila and Cebu skew higher; provincial installs are often cheaper. Get at least three quotes, and ask specifically whether the quote includes electrical inspection fees and permit filing.
Safety Requirements
These aren't optional — several are required by the Philippine Electrical Code and by your utility for grid interconnection:
- DC isolator switch (a dedicated on/off switch for the solar side of the system — mandatory, allows safe shutdown for maintenance or emergencies)
See what a DC isolator switch looks like
View on Lazada — a yellow or red rotary switch mounted near the inverter. You turn it to cut power from the panels for maintenance.
-
Proper grounding and earthing on all metallic components (connecting metal parts to the earth so stray electricity has a safe path instead of going through a person)
A surge arrester (SPD) — these small devices absorb voltage spikes from lightning strikes, protecting your inverter and wiring. Image: Wikimedia Commons, CC BY-SA 4.0 -
Lightning protection and surge arresters (devices that absorb sudden voltage spikes — critical during typhoon season, a nearby lightning strike can destroy an inverter instantly)
- Fire-rated DC cables (special wiring that won't melt in the sun or crack over time — regular household wiring isn't suitable for rooftop use) with UV-resistant sheathing for rooftop exposure
- Anti-islanding protection (built into all grid-tied and hybrid inverters — automatically shuts your system off during a power outage, protecting utility workers who may be repairing lines nearby)
- Clearly labeled "SOLAR POWER" warning signs on your distribution board (the circuit breaker box — the metal panel with switches that controls all your home's electricity) and at the inverter
Skipping any of these is both dangerous and a grounds for your utility to reject your net metering application.
Timeline
Setting expectations is half the battle. Here's the realistic end-to-end timeline:
| Phase | Duration | Notes |
|---|---|---|
| Component sourcing | 1–4 weeks | Faster if buying local; imported panels/inverters may need lead time |
| Physical installation | 1–3 days | Depends on system size and roof complexity |
| Electrical inspection | 1–2 weeks | City Hall permit process; varies by LGU |
| Net metering approval | 2–8 months | See the Net Metering section for full details |
The net metering timeline is the longest and most variable part. Physical installation is quick — a 6kW system on a straightforward roof can be done in a single day. It's the bureaucratic tail that catches most homeowners off guard.
Net Metering in the Philippines
Your system is installed and generating power. Now comes the part most solar buyers overlook until it's too late: net metering. This section covers what it actually pays you, what you need to do to get it, and why you might not even want it.
The Export Rate Gotcha
You Don't Get Full Retail Credit
Net metering credits are not equal to what you pay per kilowatt-hour. Here's the math that changes every calculator you've seen:
- You pay Meralco approximately ₱13.17/kWh (total residential rate, Feb 2026)
- Net metering only credits the generation charge: approximately ₱7.86–8.39/kWh (fluctuates monthly)
- That means you get back roughly 40–60% of what you pay per unit exported
- The rest — transmission charges, distribution charges, taxes — you never recover on exported energy
The key insight is that self-consumption beats exporting every time. When you use solar power directly during the day, you save the full ₱13+/kWh. When you export excess to the grid, you only receive ₱5–8/kWh in credit. This single fact should drive how you size your system: design for maximum self-consumption, not maximum export. A smaller system that covers your daytime load earns more value per watt than an oversized one pushing surplus to the grid at a discount.
 Using 1 kWh of solar directly saves the full ₱13.17 retail rate. Exporting that same kWh earns only ₱7.86 — a ₱5.31 loss per unit sent to the grid. Strategy: size for self-consumption, store excess in batteries.
Application Process
Getting a bidirectional meter installed is a multi-agency process with several handoffs. Here is the typical flow for Meralco customers:
 The 6-step net metering application process — budget 2-6 months from start to activation.
Step 1 — Document Prep: Gather your system documents before you do anything else. You'll need the solar installer's permit, technical specifications of your inverter and panels, the single-line diagram of your installation, and proof of a licensed electrical engineer's sign-off.
Step 2 — Distribution Impact Study: Meralco assesses whether the local distribution network can handle your export. Under 2025 ERC rules this study is free of charge. It used to be a common upsell opportunity; that loophole is now closed.
Step 3 — Yellow Card Issuance: Meralco issues an interconnection agreement. This is the green light that your system is technically cleared for grid connection.
Step 4 — Service Entrance Upgrade: Depending on your current panel setup, Meralco may require an upgraded service entrance (the point where Meralco's power line connects to your home — the wires, meter base, and main breaker at the entry point) or new metering socket to accept a bidirectional meter (a meter that can measure electricity flowing both ways — into your home AND back to the grid).
Step 5 — Electrical Permit (City Hall): Your local government unit (LGU) must issue a Certificate of Final Electrical Inspection (CFEI). This is where timelines get unpredictable.
Step 6 — Net Metering Activation: Once all permits are in order, Meralco schedules the meter swap and activates net metering on your account.
2026 DOE Mandate
Under the latest DOE rules, LGUs must issue electrical permits within 3 working days and CFEIs within 7 working days. If those deadlines are missed, the application is considered "deemed approved" automatically. The target is 10 working days total for the LGU portion. In practice, enforcement varies widely — budget extra time in areas with high solar adoption or understaffed building offices.
Fees
Net metering is not free to set up. Budget for the following:
| Fee | Amount |
|---|---|
| Interconnection fee (Meralco) | ₱7,000–12,000 one-time |
| Service entrance upgrade | ₱8,000–20,000 |
| Monthly metering fee | ~₱200/month |
| Distribution Impact Study | FREE (per 2025 ERC rules) |
| Electrical permit (City Hall) | ₱1,000–5,000 |
| Total upfront | ₱15,000–45,000 |
The wide range on the service entrance upgrade reflects the variation in existing panel setups. Older homes with undersized service entrances sit at the high end.
Gotchas and Warnings
- Unused credits expire. Meralco resets your accumulated credits annually. VECO (Visayas) resets every 6 months. You do not receive a cash payout for unused credits — they simply disappear.
- Credits don't transfer. If you sell or vacate the property, accumulated net metering credits stay with the meter and the property. They are not portable.
- Transformer saturation. If too many homes in your street have solar, your distribution transformer may become saturated. Meralco may require you to fund part of a transformer upgrade — potentially ₱50,000 or more — as a condition of interconnection.
- Building permit headaches. City Hall may require the original Building Permit for the structure, not just the solar installation permit. Informal home extensions or additions can make this genuinely difficult to resolve.
- Electric cooperative wild cards. Outside Meralco's franchise area, ECs vary enormously in their processes and fees. Some charge arbitrary "processing" fees of ₱10,000–20,000 that have no regulatory basis. Budget extra time and escalation energy if you're dealing with a rural EC.
- Process delays. Despite the 10-day DOE mandate for the LGU portion, realistic end-to-end timelines are 2–4 months. Plan accordingly and do not depend on net metering credits in your first-year ROI calculations.
The Battery Alternative
Battery + Self-Consumption May Beat Net Metering
With lithium battery storage available at approximately ₱7,000–10,000/kWh on Lazada (LFP cells, verified 2025 pricing) and the net metering export rate sitting at only ₱5–8/kWh, the math increasingly favors storage over exporting.
Storing excess solar in a battery and using it at night saves you the full ₱13/kWh retail rate instead of the ₱5–8/kWh export credit. At a ₱5–6 per kWh difference, a 5 kWh battery cycling daily can recover its cost in 5–7 years — comparable to or better than net metering depending on your usage profile.
The secondary benefit: you skip the 2–4 month approval process entirely, avoid the ₱15,000–45,000 in interconnection fees, and gain blackout protection as a bonus. For households with evening-heavy consumption, this is often the better financial choice.
Real-World Experiences
Specs and calculators only get you so far. The most useful solar education comes from people who have already paid the bills, dealt with installers, and watched their meters for a year. Here is what the Filipino solar community — primarily r/SolarPH, r/phinvest, and r/Philippines — actually reports.
Best Places to Learn from Real Owners
- Facebook: "Solar Pilipinas" — The most active PH solar community. Post your roof photos and get competitive quotes, installer reviews, and real-world troubleshooting within hours.
- Reddit: r/SolarPH — The dedicated Philippine solar subreddit. DIY setups, installer recommendations by region, net metering timelines, and ROI calculators from real Filipino homeowners.
- Reddit: r/phinvest — Investment-focused solar discussions with detailed ROI analysis.
- Reddit: r/Philippines — General solar experience threads and regional installer options.
Actual Filipino Solar Savings
These are real numbers shared by Reddit users, not marketing projections:
| Reddit User | System | Cost | Before → After Bill | ROI |
|---|---|---|---|---|
| u/finkistheword | 5.45 kWp grid-tie | ₱185,000 | ₱7,000 → ₱4,100/mo | ~5.5 years |
| u/Dragnier84 | 5.4 kWp hybrid + 10kWh DIY | ₱262,000 | ₱80,000/yr savings | ~3.3 years |
| u/juanitobalani | 5.4 kWp grid-tie | ₱230,000 | ₱12,000 → ₱4,000/mo | ~2.5–3 years |
| u/thelost_soul | 12 kWp hybrid | — | Near-zero bill | — |
| u/FCsean | 10 kWp Trina + Huawei | ₱600,000 | ₱7,000/mo reduction | ~7 years |
| u/adipotpot | Net metering | — | ₱6,000 → ₱2,800/mo | — |
| u/kaiserdx | 8 kWh hybrid | — | Bill down to "few hundreds" | — |
The spread is wide. A modest 5 kWp grid-tie can cut bills by 40–60%. A well-designed hybrid with batteries can eliminate them almost entirely, at a proportionally higher upfront cost.
What the Community Says
Overall sentiment across major threads runs roughly 70% positive, 20% cautiously neutral, and 10% negative — with most negatives tied to installers or net metering bureaucracy rather than the technology itself.
"Personally, being able to use ACs almost daily guilt-free is priceless." — u/finkistheword (384 upvotes)
"Grabe saya ng naka AC ung living room during the day and it's for free." — u/FCsean
The lifestyle shift — running air conditioning without watching the meter — is consistently cited as the best unexpected benefit.
The grid-tie vs hybrid debate is a running theme:
"Grid tie is insanely cheap. You can get a massive 12kWp system for less than 300k. With hybrid, you'd be lucky to get 6kWp at that price." — u/uesato_hinata
And the net metering credits draw consistent criticism:
"Meralco's net metering is really bad. They only credit you the generation charge, which is roughly 50% of the per kWh price." — u/Dragnier84
This is the core tradeoff: grid-tie is cheaper and simpler, but excess generation is undervalued. Hybrid with batteries lets you consume what you generate rather than feeding it back at a discount.
Brand Consensus
The community has converged on a set of trusted brands after years of collective experimentation:
- Panels: Jinko, Trina Solar, JA Solar, and Risen are the community favorites — all Tier 1 Chinese manufacturers with strong track records and local distributor support.
- Inverters: Huawei and Deye are the most recommended for hybrid systems. Solis is a solid alternative. All three have Philippine service centers.
- Batteries: LiFePO4 chemistry is universally preferred. Lead-acid is considered legacy — lower upfront cost, but shorter lifespan and worse depth-of-discharge make the total cost higher.
Cheap China batteries are a real risk
"He bought batteries and inverters from China kaso ayun, nasira ang set up because again... China. So he had to buy a second batch." — u/Thefightback1
Unknown brands shipped direct from Chinese marketplaces with no local distributor have a documented failure rate in the community. Stick to brands with Philippine distributors and warranty coverage you can actually enforce.
Installer Reviews
The installer market in the Philippines is crowded and uneven. Community consensus:
- Solaric: Mixed to negative. Called "2x more expensive" by multiple users. Fine for turnkey convenience, but you pay a significant premium.
- GoSolar Philippines: Negative — ghosting and overpricing are the common complaints. One user summed it up: "FUCK GOSOLAR... my would-have-been 300k investment ended up only costing me 100k [DIY]."
- Heatbit Solar: Positive mentions, used by several well-reviewed system owners.
- Semi-DIY / freelance electricians: The community strongly favors this path — source panels, inverter, and mounting hardware yourself, then hire a licensed electrician for the actual installation. You get installer-grade parts at supplier prices.
- Facebook group "Solar Pilipinas": Repeatedly recommended as the best place to get competitive quotes and find vetted freelance installers.
- r/SolarPH: Active discussions about installer experiences by region — search by your province or city to find local recommendations.
Common Gotchas from Real Owners
Things the brochures do not mention:
- Standard meters count exports as consumption — without net metering, your bill can actually go up if you export during the day and draw at night. Get net metering before commissioning.
- Shade kills output disproportionately — one shaded panel drops the output of the entire string it sits on, not just itself. Even a small shadow from a nearby structure is a serious design consideration.
- Cheap batteries fail — the savings from buying no-name LiFePO4 online rarely survive the first replacement cycle.
- Installer companies may not last — the market is saturating. Several users have reported that their installer no longer exists by the time they need warranty service.
- Fire risk from bad installation — undersized wiring, improper MC4 connectors (waterproof snap-together plugs for solar panels), and loose DC terminals (connection points where wires attach to the inverter or panels) are the leading causes. Always use a licensed electrician, even for a semi-DIY build.
- Battery replacement costs are ignored in most ROI estimates — LiFePO4 typically lasts 10–15 years, but that replacement cost needs to factor into any long-term payback calculation.
- Net metering takes months — Meralco and most other DUs have slow approval queues. Submit the application the moment your system is commissioned, not after.
Province vs Metro Manila
Provincial installs often outperform Metro Manila projections
Homeowners in the provinces consistently report faster ROI for several compounding reasons:
- Higher electricity rates — provincial cooperatives often charge ₱16–18/kWh versus Metro Manila's ₱11–13/kWh, so each kWh generated is worth more.
- More frequent brownouts — hybrid systems with battery backup provide direct economic value during outages, not just bill reduction.
- More roof space — larger lots mean more panel capacity, better tilt angles, and fewer shading constraints.
- Lower labor costs — electrician day rates outside Metro Manila are meaningfully lower.
If you are deciding between a province property and a Metro Manila property for solar ROI, the province wins on almost every metric.
Maintenance & Troubleshooting
A solar system that works well on day one should still work well in year ten — if you maintain it. The good news: a Philippine setup requires very little active effort. The bad news: the things you do need to do are easy to forget.
Cleaning
Rain handles most of the cleaning for you. The Philippines gets enough rainfall that panels rarely accumulate serious grime between storms. For most setups, manual cleaning 2-4 times per year is sufficient — a soft brush and plain water to remove bird droppings, heavy dust, or anything else rain didn't dislodge.
A few rules:
- Never use a pressure washer. The high-pressure jet damages the anti-reflective coating on panel glass, permanently reducing light transmission.
- Clean in the early morning when panels are still cool. Spraying cold water onto hot panels mid-afternoon causes thermal shock and micro-cracks in the glass or cell substrate over time.
- No soap or chemical cleaners. Water is enough. Detergent residue attracts more dirt and can leave streaks that reduce output.
Monitoring via Home Assistant
Passive monitoring through Home Assistant is where you recover production losses before they compound. Set up alerts for production drops: if your actual output falls more than 15% below the Forecast.Solar prediction for three or more consecutive days, investigate.
Common causes to check in order:
- Dirty panels (most likely after a dry spell)
- New shade sources — a tree branch that grew into your array's sightline
- Inverter thermal derating — some inverters throttle output above 40-45°C ambient. Check inverter temperature sensors if exposed.
- Panel or string fault — HA should surface any inverter error codes via notification automations
Track monthly and yearly production totals using HA's Energy Dashboard long-term statistics. A gradual year-over-year decline of 0.5-0.7% is normal panel degradation. A sudden drop of 5%+ warrants inspection.
Battery Health
LFP (lithium iron phosphate) batteries are the dominant chemistry for home solar in the Philippines and they are genuinely long-lived — rated for 6,000+ cycles at 80% depth of discharge, which works out to roughly 16 years of daily cycling. But that rated lifespan assumes you treat them correctly.
Key practices:
- Avoid deep discharge below 20% SOC (State of Charge — how "full" the battery is, like a fuel gauge). Most inverters let you set a discharge floor. Set it and leave it.
- Monitor charge/discharge curves in HA. A healthy battery charges and discharges at a consistent voltage profile. Sudden capacity drops — the battery "full" indicator triggering at an unusually low watt-hour count — are the first sign of cell degradation.
- Keep batteries ventilated and below 45°C. Heat accelerates electrolyte breakdown. Enclosed battery rooms need airflow, especially during charging when cells generate heat.
- BMS communication matters. Your inverter should be reading SOC from the battery's BMS (Battery Management System — a built-in circuit board that monitors and protects the battery), not estimating from voltage alone. Verify this in the inverter settings.
Common Issues
| Symptom | Likely Cause | Fix |
|---|---|---|
| Production lower than expected | Shade, dirty panels, inverter derating in heat | Clean panels, check for new shade sources, verify inverter isn't thermal throttling |
| Battery not charging fully | Wrong charge voltage setting, BMS communication error | Check inverter battery profile settings, verify BMS communication cable is seated |
| HA integration disconnecting | Firmware mismatch, network issues, Modbus timeout | Update inverter firmware, check network stability, increase Modbus timeout in HA config |
| Grid export but bill increased | No net metering / no zero-export limiter active | Apply for net metering or install zero-export limiter immediately |
| Inverter showing fault codes | Various — grid voltage or frequency out of range | Check inverter manual; most Philippine faults are grid-side (MERALCO voltage fluctuation is common) |
Annual Maintenance
If you signed a maintenance contract with your installer, expect to pay ₱3,000–6,000/year for an annual visit that covers panel cleaning, connection inspection, and a system health report. Worth it for the first year or two while you're still learning your system.
DIY annual checklist:
- Inspect all exposed wiring and conduit (protective tubing that wires run through) for UV degradation or pest damage
- Check mounting rail bolts — typhoon winds work fasteners loose over time
- Clean panels if not recently rained
- Verify all grounding connections are secure and rust-free
- Check DC isolator (emergency shutdown switch for the solar panels) and AC breaker operation
- Log inverter lifetime kWh and compare to prior year for degradation tracking
Resources & Next Steps
You've made it through the full guide. This final section pulls together financing options, communities worth joining, honest takes on installers, and a checklist to keep you on track.
Financing
Going solar doesn't require paying everything upfront. Several loan programs cater specifically to Filipino homeowners:
- Pag-IBIG: Solar panel loans up to ₱500,000 — available to active Pag-IBIG Fund members. One of the most accessible options for private-sector employees.
- GSIS: Similar solar loan programs for government employees. Check with your agency HR for current terms and limits.
- Home improvement loans: Some banks (BDO, BPI, Metrobank) offer home improvement loans using your property as collateral — capable of funding larger systems in the ₱500K–1M+ range.
Tip
Factor interest costs into your ROI calculation. A 5-year loan at 6% adds approximately 15% to total system cost, which can push your payback period from 6 years to 7+. Run the numbers before signing.
Communities
The fastest way to learn is from people who've already been through it. Start with Reddit, then use Facebook carefully.
Reddit (Trusted — Real User Discussions)
- r/SolarPH — THE dedicated Philippine solar subreddit. Genuine user discussions: DIY setups with costs, installer recommendations by region, net metering processing times, ROI calculators. No seller spam — just real people sharing real experiences. Start here.
- r/phinvest — Investment-focused solar discussions with detailed ROI analysis, verified monthly savings reports (with actual before/after bills), and honest installer reviews with upvotes indicating community trust. The most cited data in this guide comes from r/phinvest threads 1.
- r/Philippines — General solar experience threads, good for regional installer options outside Metro Manila.
Facebook Groups (Use With Caution)
Facebook Solar Groups Are Full of Scams
Filipino solar FB groups have become marketplaces flooded with seller spam, fake accounts, and scam listings. Many "500W panels for ₱479" posts are outright scams. Seller posts outnumber genuine user discussions 10:1. Use FB groups for getting competitive quotes (post your requirements, compare responses), but verify everything independently — check seller registration, ask for datasheets, inspect products in person, and cross-check prices against Reddit/distributor pricing.
- DIY Solar Setup (955K members) — Largest group but mostly seller posts and installation showcase videos. Useful for seeing what systems people are actually building.
- Solar Power Philippines (133K members, private) — More curated, genuine user discussions. Worth joining for the community.
- Solar Pilipinas Buy and Sell (23K members) — Marketplace-style. Good for component deals, but verify seller legitimacy.
- SOLAR METRO MANILA (94K members) — NCR-focused installer recommendations.
- Solar Power Group (Legit Sellers) (19K members) — Claims to vet sellers, but still verify independently.
Home Assistant & Tech Communities
- Home Assistant Community Forum — Essential for HA integration. Search your inverter brand for automation blueprints and HACS add-ons.
- DIY Solar Power Forum — International DIY community with a Philippines section. More technical, good for wiring and component discussions.
Where to Buy
Whether you're going full-service installer or semi-DIY, knowing where to source components helps you compare quotes and avoid markups:
| Platform | What to Search | Link |
|---|---|---|
| Lazada PH | "solar panel 550w", "deye hybrid inverter", "lifepo4 battery 48v" | lazada.com.ph |
| Shopee PH | Same searches — sometimes cheaper during sale events | shopee.ph |
| AliExpress | Bulk orders, 2-4 week shipping — stick to verified sellers | aliexpress.com |
| JFL Solar | PH distributor, wholesale pricing — used by installers | jflsolar.com |
| Facebook Marketplace | "solar panel" — sometimes secondhand at big discounts | facebook.com/marketplace |
Buy from distributors with local warranty support
The cheapest option is rarely the best value. Components from sellers with no Philippine distributor leave you with no recourse if something fails. Prioritize sellers who can service the warranty in-country.
Installer Directory
These are the most frequently mentioned installers in Filipino solar communities, along with honest community takes:
| Installer | Coverage | Reputation | Notes |
|---|---|---|---|
| Solaric | Metro Manila | Mixed | Pioneering brand but "2× more expensive" per multiple r/phinvest users 2 |
| SolarNRG | Nationwide | Positive | Dutch-backed, strong after-sales. Frequently recommended on Solar Pilipinas 3 |
| PHILERGY | Metro Manila | Positive | German components, premium pricing. Highest Google reviews 4 |
| Buskowitz | Nationwide | Positive | Largest PH residential installer by volume 5 |
| Heatbit Solar | Metro Manila | Positive | Used by u/finkistheword (384 upvotes on r/phinvest) — 5.45kWp for ₱185K 6 |
| GoSolar | Metro Manila | Negative | Multiple reports of ghosting customers and overpricing 7 |
Get Multiple Quotes
Always get 3 or more quotes before committing. Join "Solar Pilipinas" on Facebook and post your requirements — roof size, average kWh consumption, and general location — and you'll get competitive offers from verified installers within a day or two. Price differences of ₱50,000–100,000 for the same spec are common.
Trusted Suppliers Directory
Whether you're doing full DIY or semi-DIY (buy parts yourself, hire an electrician to install), here's where Filipino solar buyers actually source their components. Organized by type: full-service installers, component distributors, online stores, and community-recommended sellers.
Full-Service Installers (Buy + Install + Warranty)
These companies design, supply, install, and handle net metering paperwork. Higher price but turnkey experience.
| Company | Coverage | Specialty | Price Level | Community Take |
|---|---|---|---|---|
| SolarNRG | Nationwide | 20+ years experience, Dutch group | Mid-High | Strong after-sales 3 |
| Buskowitz Energy | Nationwide | Largest PH residential installer | Mid | Volume pricing, good financing 5 |
| PHILERGY German Solar | Metro Manila | German components, premium | High | Highest Google reviews 4 |
| Meister Solar | Central Luzon | German engineering, Angeles City | Mid-High | Good for Clark/Pampanga area 12 |
| Solaric | Luzon | Pioneer PH solar, online shop | Mid-High | Mixed — "2× industry avg" per Reddit 2 |
| Heatbit Solar | Metro Manila | Residential focus | Mid | Used by r/phinvest top reviewer 6 |
| Solviva Energy | Nationwide | AboitizPower, Rent-to-Own | Mid | Good for no-upfront-cost 13 |
| Solar Up | Nationwide | Custom design per property | Mid | Newer but reliable 14 |
| Nolan Solar | Rizal / Metro Manila | Residential hybrid installs | Mid | Active on FB, recent install in Antipolo (Apr 2026) 8 |
| Shelter Solutions | Cebu / Visayas | 12kW+ hybrid with battery | Mid | 12kW hybrid + 15kWh in Cebu (Apr 2026) 9 |
| First Choice Solar | Davao / Mindanao | Free bill review, residential | Mid | Active in Davao, free electric bill assessment 10 |
| QC Trading Corp | Manila (Sta. Cruz) | Component supplier + installer | Low-Mid | Physical store: 518 Tomas Mapua St., Sta. Cruz, Manila 11 |
Component Distributors (Buy Parts, Install Separately)
Best for semi-DIY buyers who want to source parts cheaper and hire their own electrician.
| Supplier | What They Sell | Location | Price Level | Notes |
|---|---|---|---|---|
| JFL Solar | Panels (Seraphim, AE Solar, Trina), Inverters (Deye, LuxPower, Sunways) | Distributor — online | Wholesale | Public price lists — best for price benchmarking 15 |
| One Solar / Unli Solar | Full packages: panels, inverters, batteries, mounting | Multiple branches | Low-Mid | Openly displays prices. Good for price comparison. 16 |
| ABC Solar Electronics | Panels, inverters, batteries, Deye products | Cebu | Low-Mid | Cebu-based — best option for Visayas buyers 17 |
| Transgen Solutions | Inverters, batteries, UPS | Quezon City | Low-Mid | Physical store in QC (Cubao + Tandang Sora) — see before buying 18 |
Online Marketplaces — Buyer Beware
| Platform | What to Buy Here | What to Avoid | Tips |
|---|---|---|---|
| Lazada PH | Small accessories (MC4 connectors, DC cables, mounting clamps, fuses, SPDs) | Full panels from unknown sellers ("500W" for ₱479 = scam) | Check seller ratings (4+ stars, 50+ reviews). Buy from LazMall when possible. 19 |
Community-Recommended Sellers (Facebook Groups)
The real gold mine for PH solar pricing is Facebook Solar Pilipinas group — members post quotes, compare prices, and recommend sellers daily.
| Group / Source | Members | What They're Known For | Link |
|---|---|---|---|
| DIY Solar Setup | 955K | Largest PH solar group — installation showcases, component questions | FB Group |
| Solar Power Philippines | 133K (private) | Curated discussions, less spam than public groups | FB Group |
| SOLAR METRO MANILA | 94K | NCR-focused, local installer recs | FB Group |
| SOLAR POWER in PHILIPPINES | 58K | General discussions | FB Group |
| Solar Pilipinas Buy and Sell | 23K | Marketplace — panels, inverters, batteries with prices | FB Group |
| Solar Power Group (Legit Sellers) | 19K | Claims to vet sellers — still verify independently | FB Group |
| r/SolarPH | — | Installer recs by region, DIY setups, ROI calculators — most trusted | |
| KalowBAT | — | Detailed DIY tutorials, wiring diagrams, component recommendations | YouTube |
The Smart Buying Strategy
- Get quotes first — Post in Solar Pilipinas FB group with your bill amount and roof size. You'll get 5-10 quotes within 24 hours.
- Compare against distributor prices — Check JFL Solar and One Solar price lists to understand the markup.
- Buy panels + inverter from a distributor — Save 20-30% vs full-service installer.
- Buy small parts from Lazada/Shopee — MC4 connectors, cables, fuses, SPDs are fine to buy online.
- Hire a licensed electrician — ₱15,000-30,000 for the install. They don't need to supply parts.
- Handle net metering yourself — Or pay ₱10,000-15,000 for someone to process it.
Red Flags — Avoid These Sellers
- No physical address or phone number
- "500W panels" for under ₱2,000 (these are 30-50W panels with fake labels)
- No datasheet or certification documents available
- Pressure to "buy now, limited stock" (legitimate solar components are NOT scarce)
- No warranty documentation (real Tier-1 panels have 25-year warranties)
- Seller can't explain the difference between their panels (they're reselling anything for profit)
How to Tell: Cheap vs Scam vs Pricey
Not all low prices are scams, and not all high prices mean quality. Here's how to evaluate any quote or listing:
Step 1: Check the per-watt price
Calculate: Price ÷ Wattage = ₱/W
| ₱/W Range (panels) | Verdict | Why |
|---|---|---|
| Below ₱5/W | ❌ Scam | Real 550W+ panels cost ₱4,400+ wholesale. Below ₱5/W means fake wattage labels, used/damaged panels, or outright fraud. |
| ₱7-10/W | ✅ Good deal | Installer/distributor pricing. This is what you should target for semi-DIY. |
| ₱10-13/W | ⚠️ Retail markup | Normal Lazada/Shopee retail price. You're paying convenience markup. Acceptable if buying 1-2 panels. |
| ₱13-18/W | ⚠️ Overpriced | Full-service installer markup. You're paying for design + install + warranty. Acceptable if turnkey, not acceptable for panels-only. |
| Above ₱18/W | ❌ Rip-off | Unless it's a premium brand (REC, SunPower) with 40-year warranty, this is gouging. |
Step 2: Verify the product is real
| Check | How | Pass | Fail |
|---|---|---|---|
| Datasheet | Ask seller for the official PDF datasheet | Has model number, efficiency, certifications, manufacturer contact | No datasheet = not a real product |
| Weight | Check the datasheet weight vs actual | 550W panel = ~28kg, 620W = ~32kg | "500W panel" that weighs 3kg = portable charger, not a panel |
| Dimensions | Check datasheet dimensions | 550W ≈ 2.28×1.13m, 620W ≈ 2.47×1.13m | Way too small for claimed wattage |
| Certifications | Look for IEC 61215 / IEC 61730 on label | Markings on the panel label + in the datasheet | No markings = untested, possibly unsafe |
| Serial number | Every real panel has a unique serial on the back label | Scannable barcode, matches manufacturer database | No serial = reject |
Step 3: Cross-reference the price
Before buying from ANY source, check these three references:
- JFL Solar price list — distributor SRP. If a seller's price is way below JFL's, ask why.
- One Solar / SolarPrice.ph — openly listed package prices. Good baseline.
- r/SolarPH or r/phinvest — search for the brand/model. Real users post what they actually paid.
Step 4: The ₱/W quick calculator for full systems
| Component | Fair ₱/W Range | Example (6.2 kWp) |
|---|---|---|
| Panels only | ₱8-11/W | ₱49,600-68,200 |
| Grid-tied system (installed) | ₱46-62/W per kW | ₱285,200-384,400 |
| Hybrid + battery (installed) | ₱75-95/W per kW | ₱465,000-589,000 |
If a full-service installer quotes you above ₱100/W per kW for a hybrid system, you're being overcharged. Get more quotes.
Real Example: Spotting a Scam vs a Deal
Scam: "500W Solar Panel Complete Set" on Lazada for ₱698 (1.4 ₱/W) — Product weight: 2.1kg, dimensions: 35×25cm. This is a 30W portable phone charger with fake labeling.
Deal: "JA Solar 585W Bifacial N-Type" from FB installer for ₱5,700 (9.7 ₱/W) — Matches JFL Solar distributor pricing, has official datasheet, IEC certified, 25-year warranty. This is a legitimate panel at installer price.
Overpriced: Same JA Solar 585W from Solaric for ₱11,000 (18.8 ₱/W) — Real panel, real warranty, but nearly 2× the installer price. You're paying for the Solaric brand name and turnkey service.
Pre-Installation Checklist
Work through this list before signing any contract:
- Analyze 3 months of electricity bills — calculate average monthly kWh consumption
- Assess your roof: orientation, shade at different times of day, and structural condition
- Choose your system type using the Decision Matrix (Section 3)
- Set your budget and pick a tier (Section 4)
- Select your inverter — consider Home Assistant compatibility (Section 6)
- Get 3+ quotes from installers, or source components for a semi-DIY build
- Start the net metering application early — approval takes months (Section 9)
- Plan your Home Assistant integration: sensors, automations, and energy dashboard (Section 6)
- Pre-wire an EV charging circuit if you're planning an electric vehicle (Section 7)
- Join "Solar Pilipinas" on Facebook and r/SolarPH for ongoing support and community knowledge
-
r/phinvest solar threads consistently provide the most detailed, verifiable user data — including exact system costs, installer names, bill reductions, and ROI timelines. Posts with 100+ upvotes indicate strong community validation. ↩
-
Multiple users on r/phinvest report Solaric charges approximately 2× industry average for equivalent systems. ↩↩
-
SolarNRG Philippines — 20+ years in PH solar market, Dutch parent company. ↩↩
-
PHILERGY German Solar — highest-rated on Google Reviews per Solaren Power top 10 list. ↩↩
-
Buskowitz Energy — founded 2012, largest residential installer. ↩↩
-
u/finkistheword on r/phinvest — installed 5.45kWp grid-tie via Heatbit for ₱185,000. Bill dropped from ₱7K to ₱4.1K/month. Post received 384 upvotes. ↩↩
-
u/kamotengASO on r/phinvest — "FUCK GOSOLAR... Since then, I just did my own research and decided to go DIY hybrid. My would-have-been 300k investment ended up only costing me 100k." ↩
-
Nolan Solar — installation video posted in Solar Power Philippines FB group, Antipolo Rizal, April 2026. ↩
-
Shelter Solutions — "12kW Hybrid Solar Setup + 15kWhr Battery Storage, Installation Date: April 6, 2026" — Solar Philippines Community FB group. ↩
-
First Choice Solar Corporation — Davao City. "Drop your last electric bill and we'll review it for free" — Solar Philippines Community FB group, April 2026. ↩
-
QC Trading Corp — "We supply reliable, high-quality solar materials from the world's trusted brands. 518 Tomas Mapua St., Sta. Cruz, Manila" — Solar Power Philippines FB group. ↩
-
Meister Solar — German-Philippine team, HQ in Angeles City. Recommended for Central Luzon buyers. ↩
-
Solviva Energy — subsidiary of AboitizPower, one of PH's largest renewable energy companies. Offers rent-to-own solar. ↩
-
Solar Up Philippines — custom solar solutions. Newer entrant but consistent execution per early reviews. ↩
-
JFL Solar — Philippine distributor with public SRP and installer pricing. Used as pricing reference throughout this guide. ↩
-
One Solar / Unli Solar — multiple branches, transparent pricing. Recommended on DIY Solar Power Forum. ↩
-
ABC Solar Electronics — Cebu-based supplier and installer. ↩
-
Transgen Solutions — physical showroom in Quezon City for inverters, batteries, and UPS. | 2cay Solar | Complete system packages | Metro Manila | Mid | Free delivery within Metro Manila | | Solana4U | Solar components + technical support | Online | Mid | Good technical support for DIY buyers | | SolarCell PH | Panels, systems, installation | Online | Mid | Trusted PH solar company | ↩
-
"Most homeowners are better off buying from a trusted installer, not from online marketplaces" — Solar Calculator Philippines. | Shopee PH | Same as Lazada — accessories and small components | Same — avoid too-good-to-be-true panel prices | Compare with Lazada pricing. Sometimes cheaper on Shopee. | | AliExpress | Bulk panels, inverters, batteries for experienced buyers | Everything if you're a beginner — no local warranty, 2-4 week shipping, customs risk | Only for experienced DIYers who understand import duties and can test components themselves. | | Facebook Marketplace | Secondhand panels (sometimes great deals), local seller pickup | Anything without serial numbers or datasheets | Meet in person, inspect physically, check panel labels match claimed wattage. | ↩